Creating and interacting with an ERC-20 token on the Filecoin Virtual Machine using web3.js
Learn to create and interact with an ERC-20 token on the Filecoin Virtual Machine using web3.js. This comprehensive guide covers setting up your environment, deploying smart contracts, and executing token transfers, making web3 development accessible even for beginners.


Navigating the web3 space can be challenging if you're not very technical or lack experience. But don't worry, that's why we wrote this handy guide showing you how to navigate the Filecoin Virtual Machine using web3.js
What You'll Need
- Metamask Wallet.
- ERC-20 contract with mintable function from OpenZeppelin.
- Visual Studio Code.
- Live Server Plugin
About the Filecoin Virtual Machine:
Protocol Labs created the FVM to solve problems related to storage on the internet. It specifically addresses issues with centralized servers and enhances the overall programmability of the Filecoin storage network.
https://blog.quicknode.com/web3-development-evm-compatible-blockchains-101/
Currently, there are two available networks: Filecoin Mainnet & Filecoin Calibration Testnet.
Filecoin Mainnet
This is the production network where all nodes are connected
- Network Name: Filecoin - Mainnet
- RPC URL: https://api.node.glif.io
- Chain ID: 31
- Currency: FIL
- Decimals: 18
- Explorer: Beryx | Filfox | Glif
Filecon Calibration Testnet
This network allows you to test features from the Filecoin Mainnet, but it should not be used to launch apps for production.
- Network Name: Filecoin - Calibration testnet
- RPC URL: https://api.calibration.node.glif.io/rpc/v1
- Chain ID: 314159
- Currency: tFIL
- Decimals: 18
- Explorer: Beryx | Filfox | Glif
https://beryx.io/address_converter
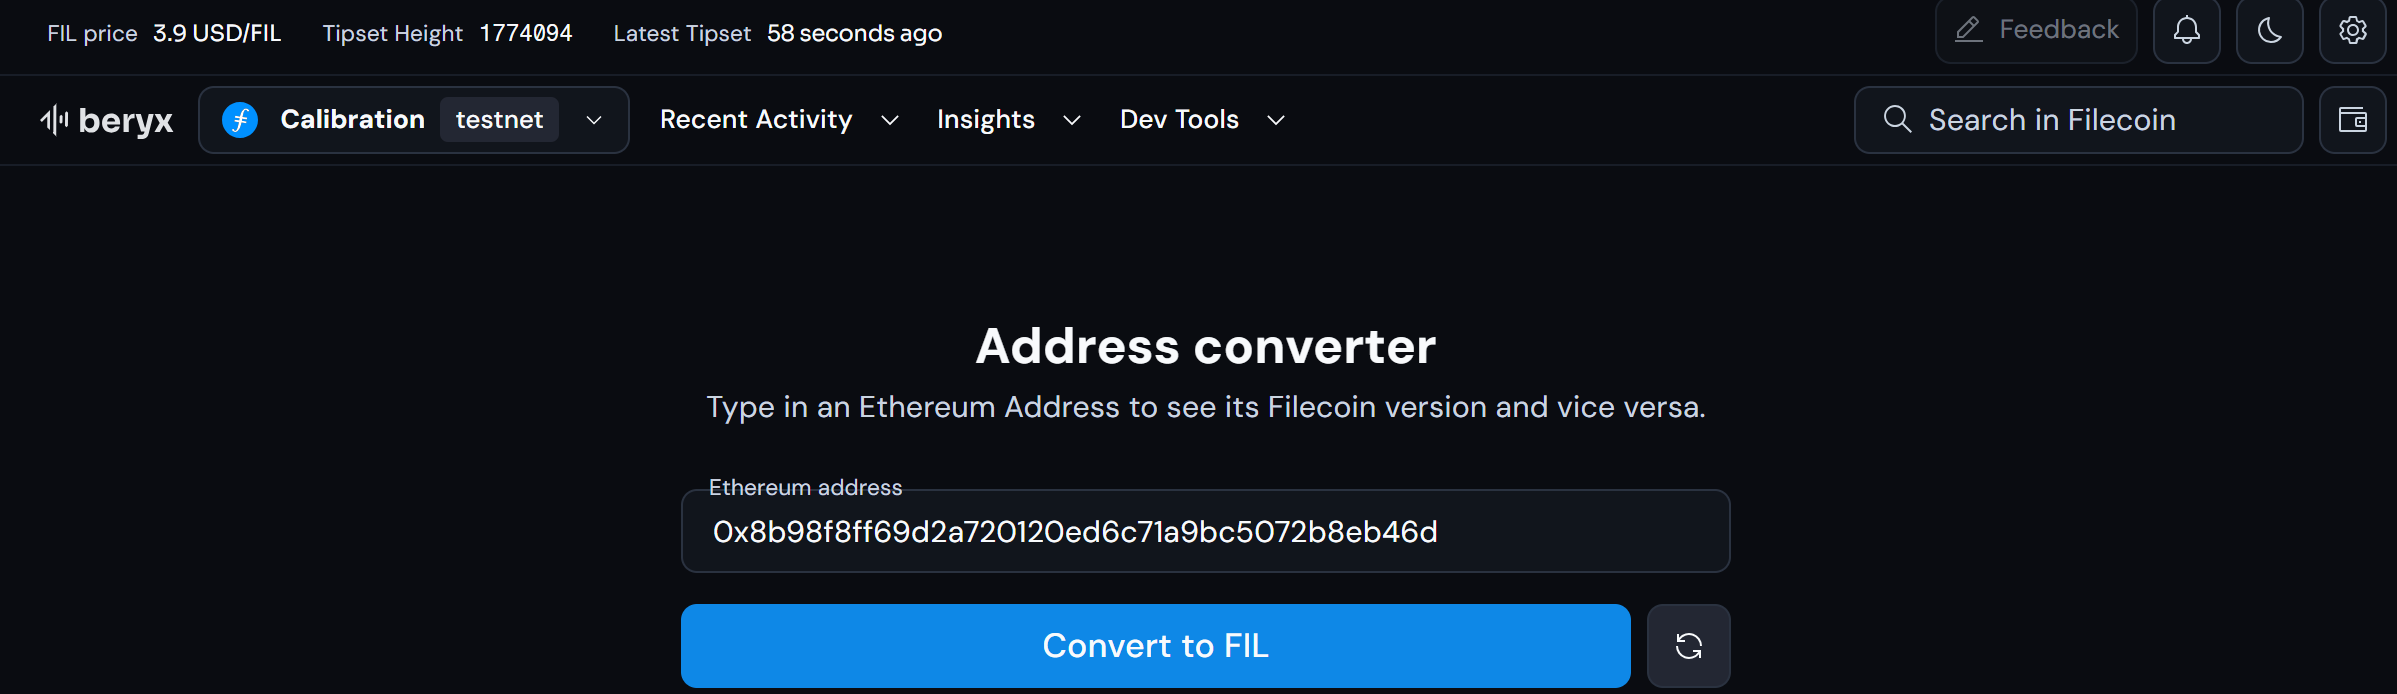
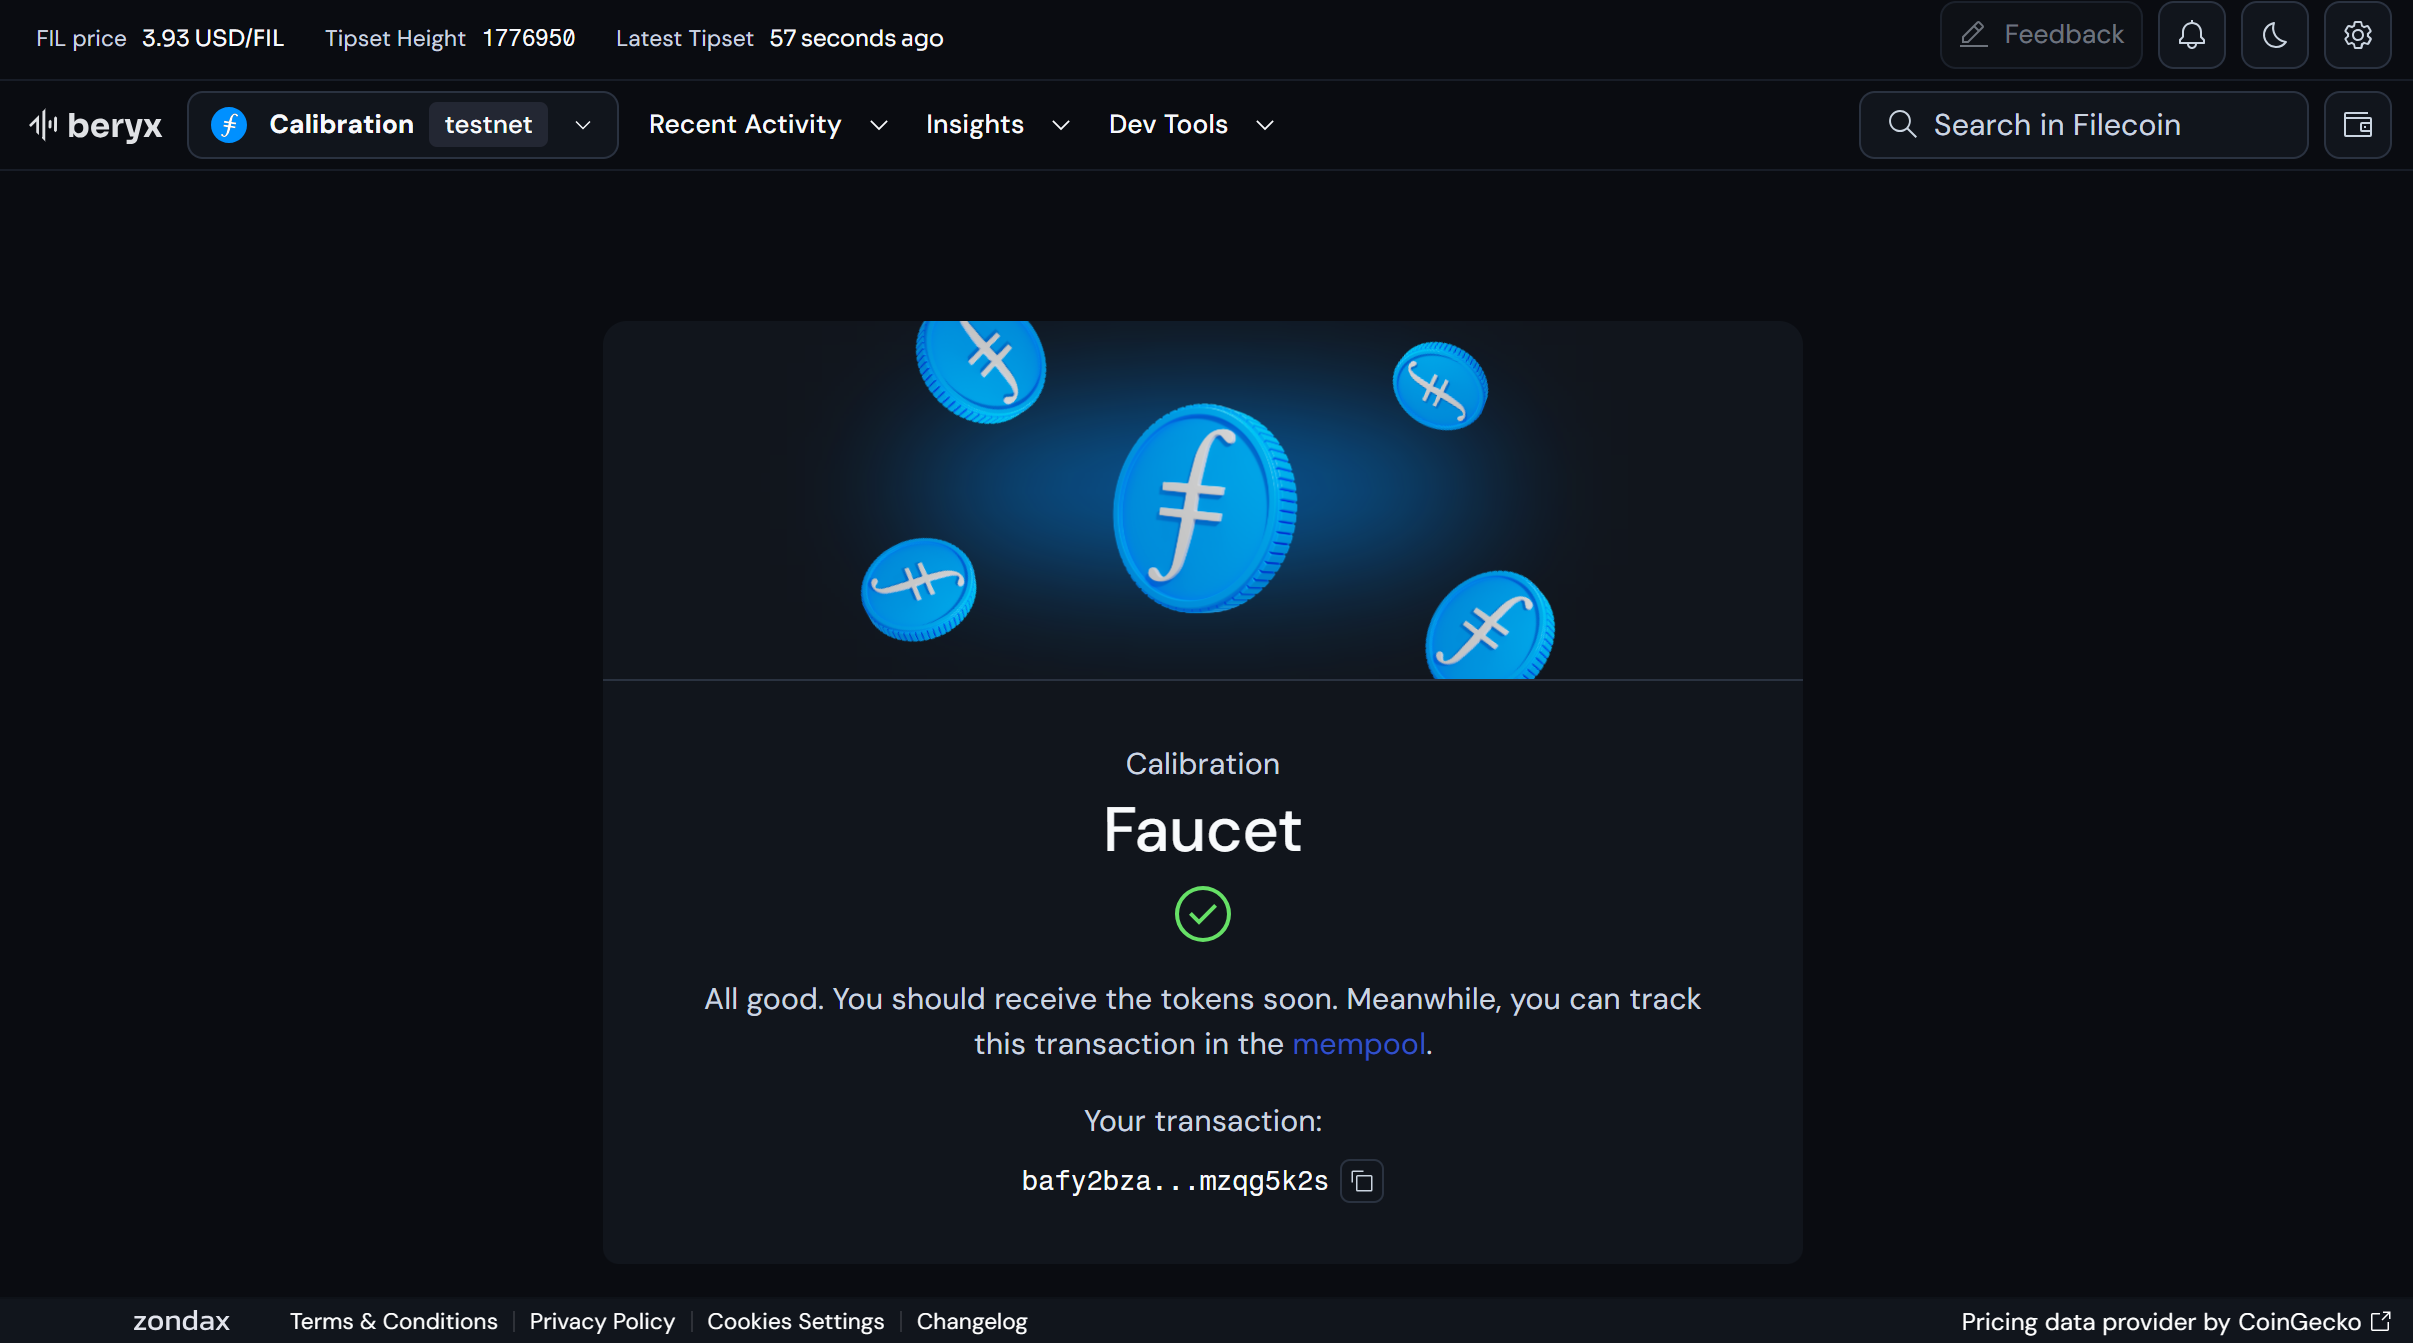
Fund your wallet on the Filecoin Virtual Machine testnet
To fund your wallet, you can receive funds through here
After converting your address to the f4 format, you need to paste it and then click on the "Get Tokens" button.
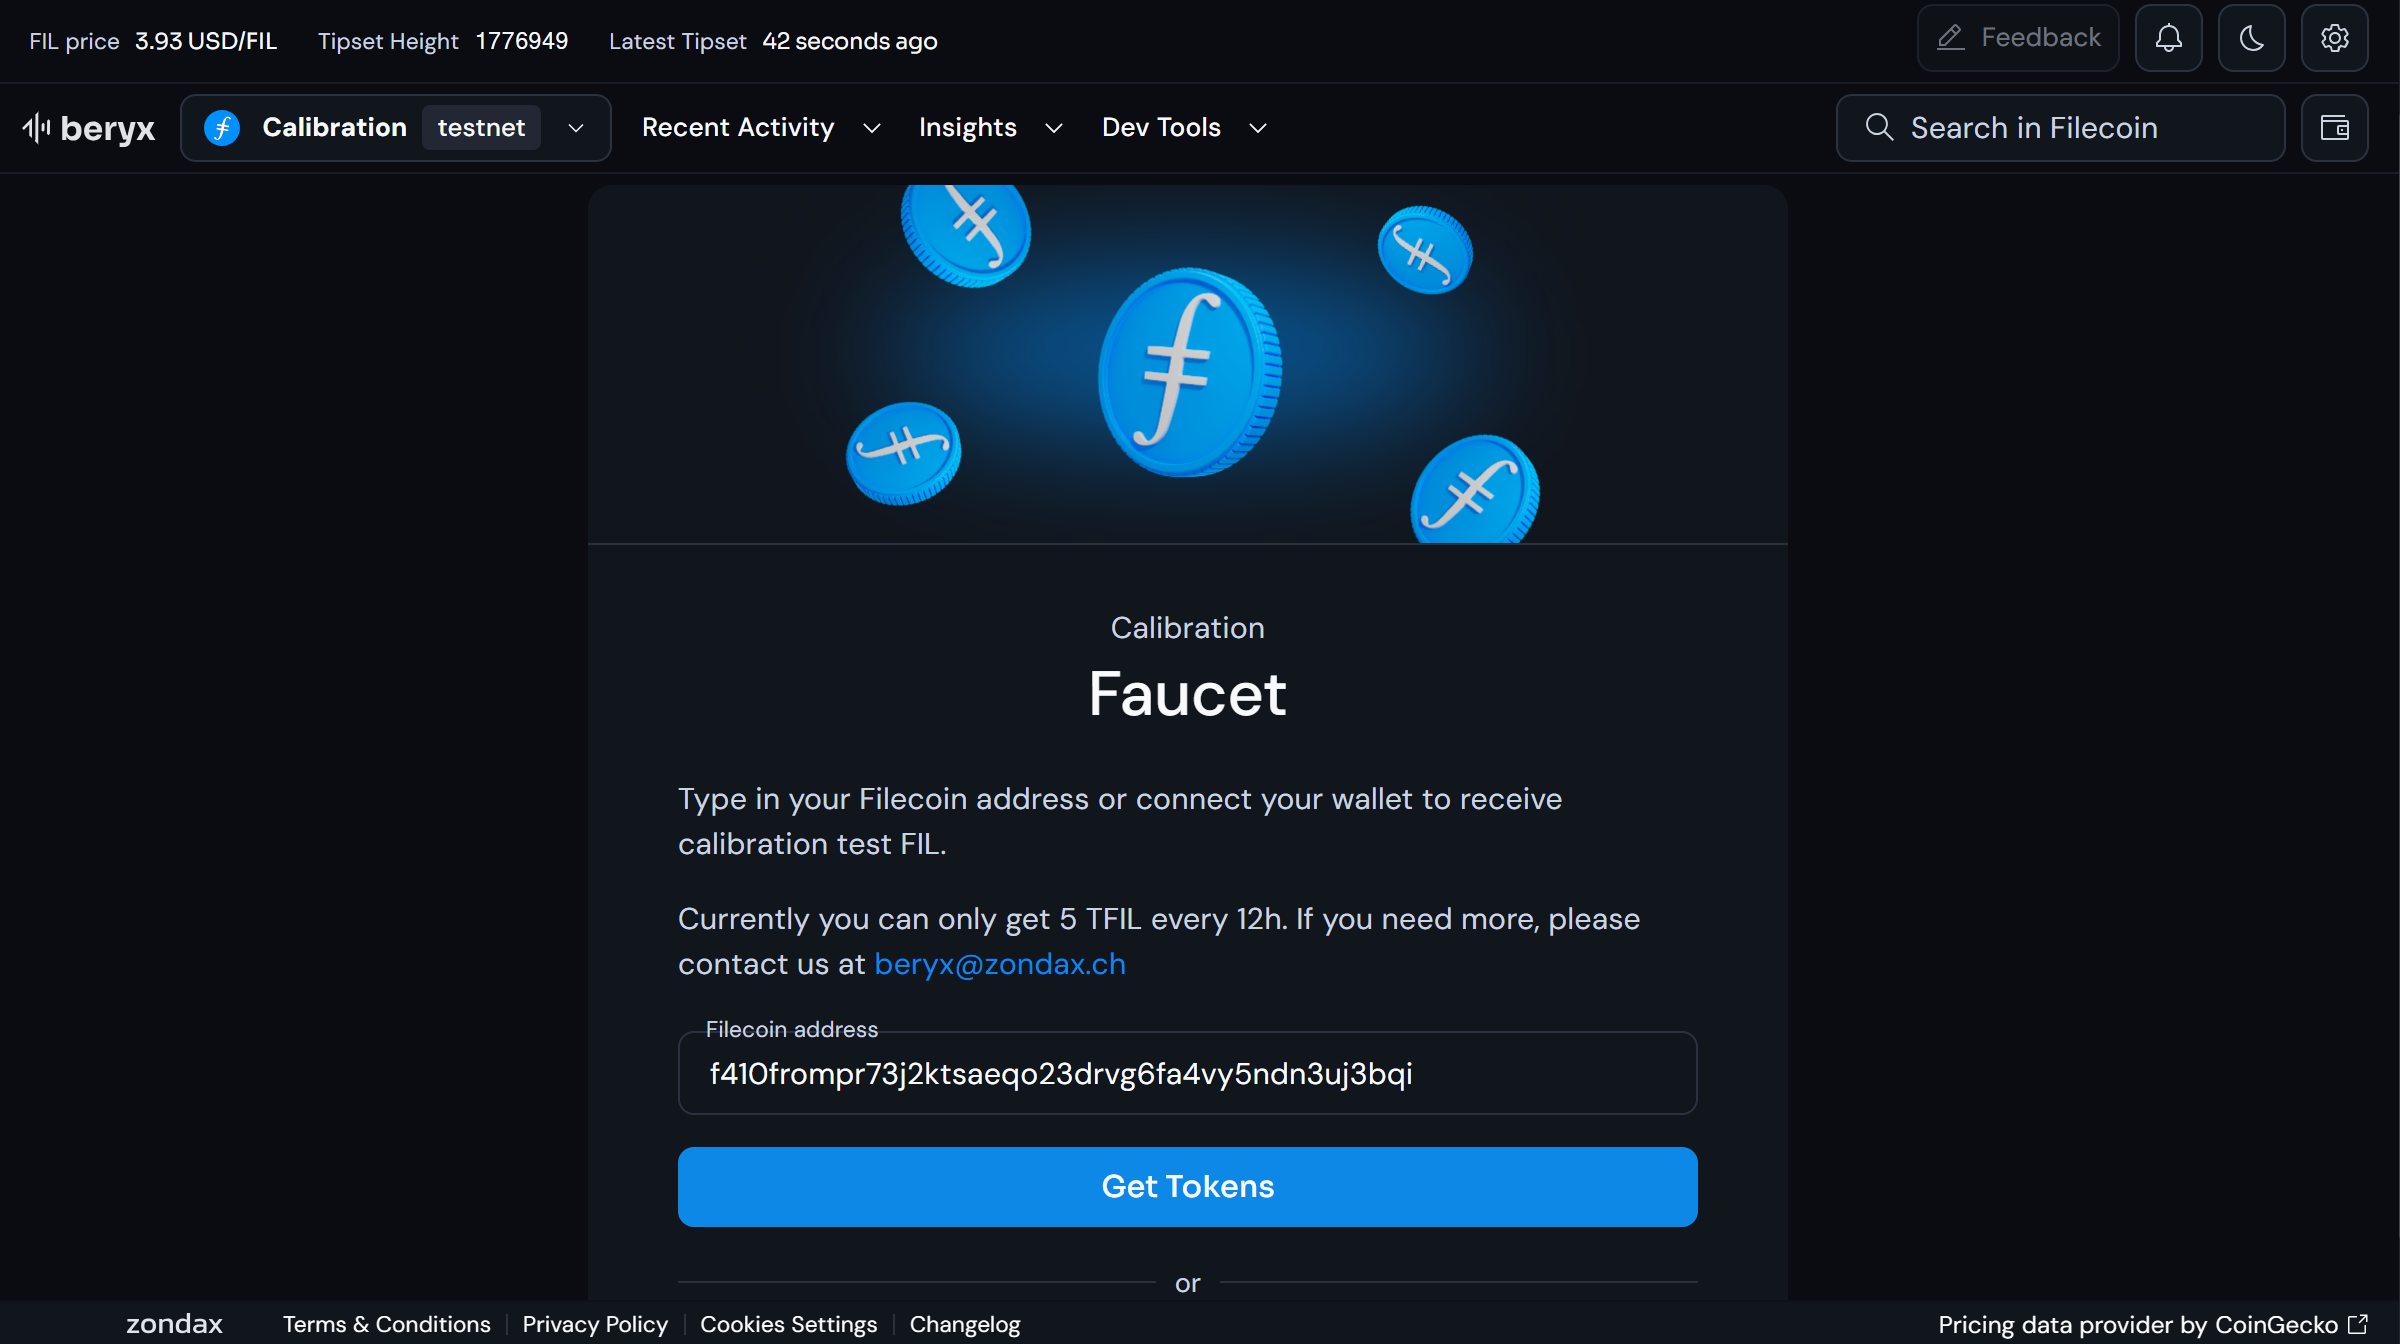
As a result, you'll receive your tFil tokens!
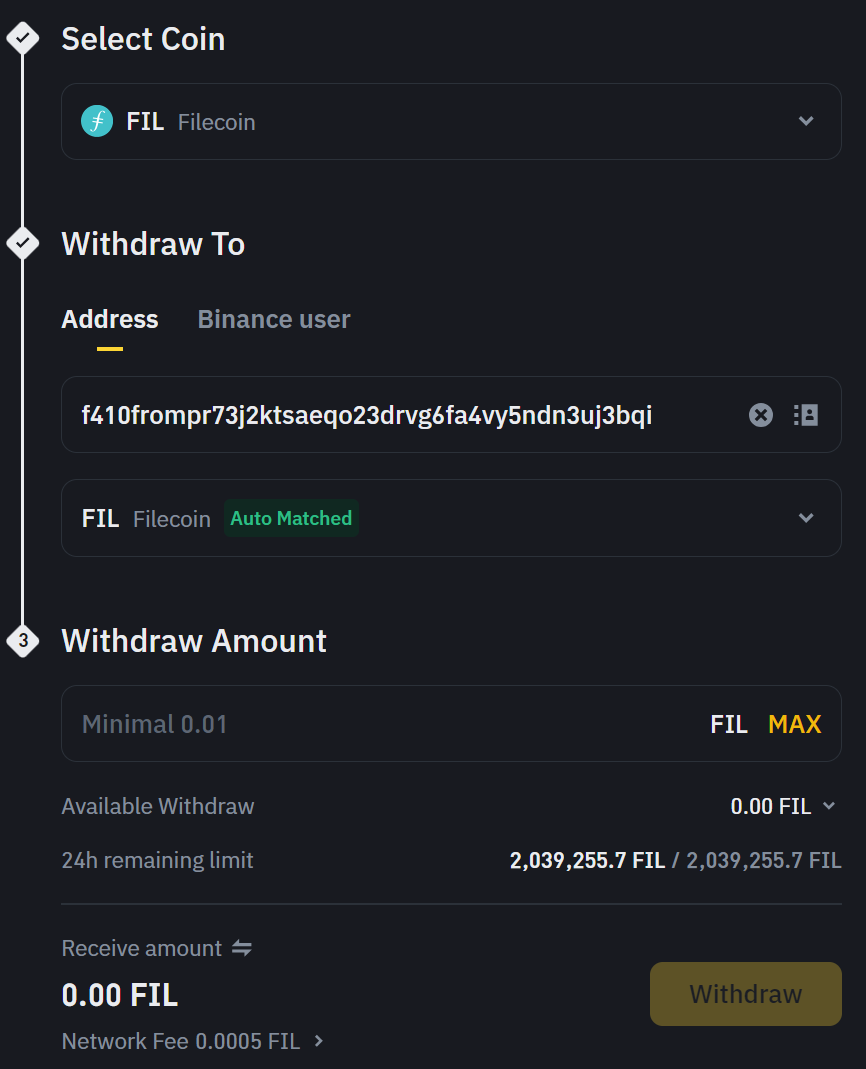
Fund your wallet on the Filecoin Virtual Machine mainnet
To send funds from any exchange, you need to enter the Filecoin address (f410) that you previously converted from your Ethereum address.
In our case we used Binance:
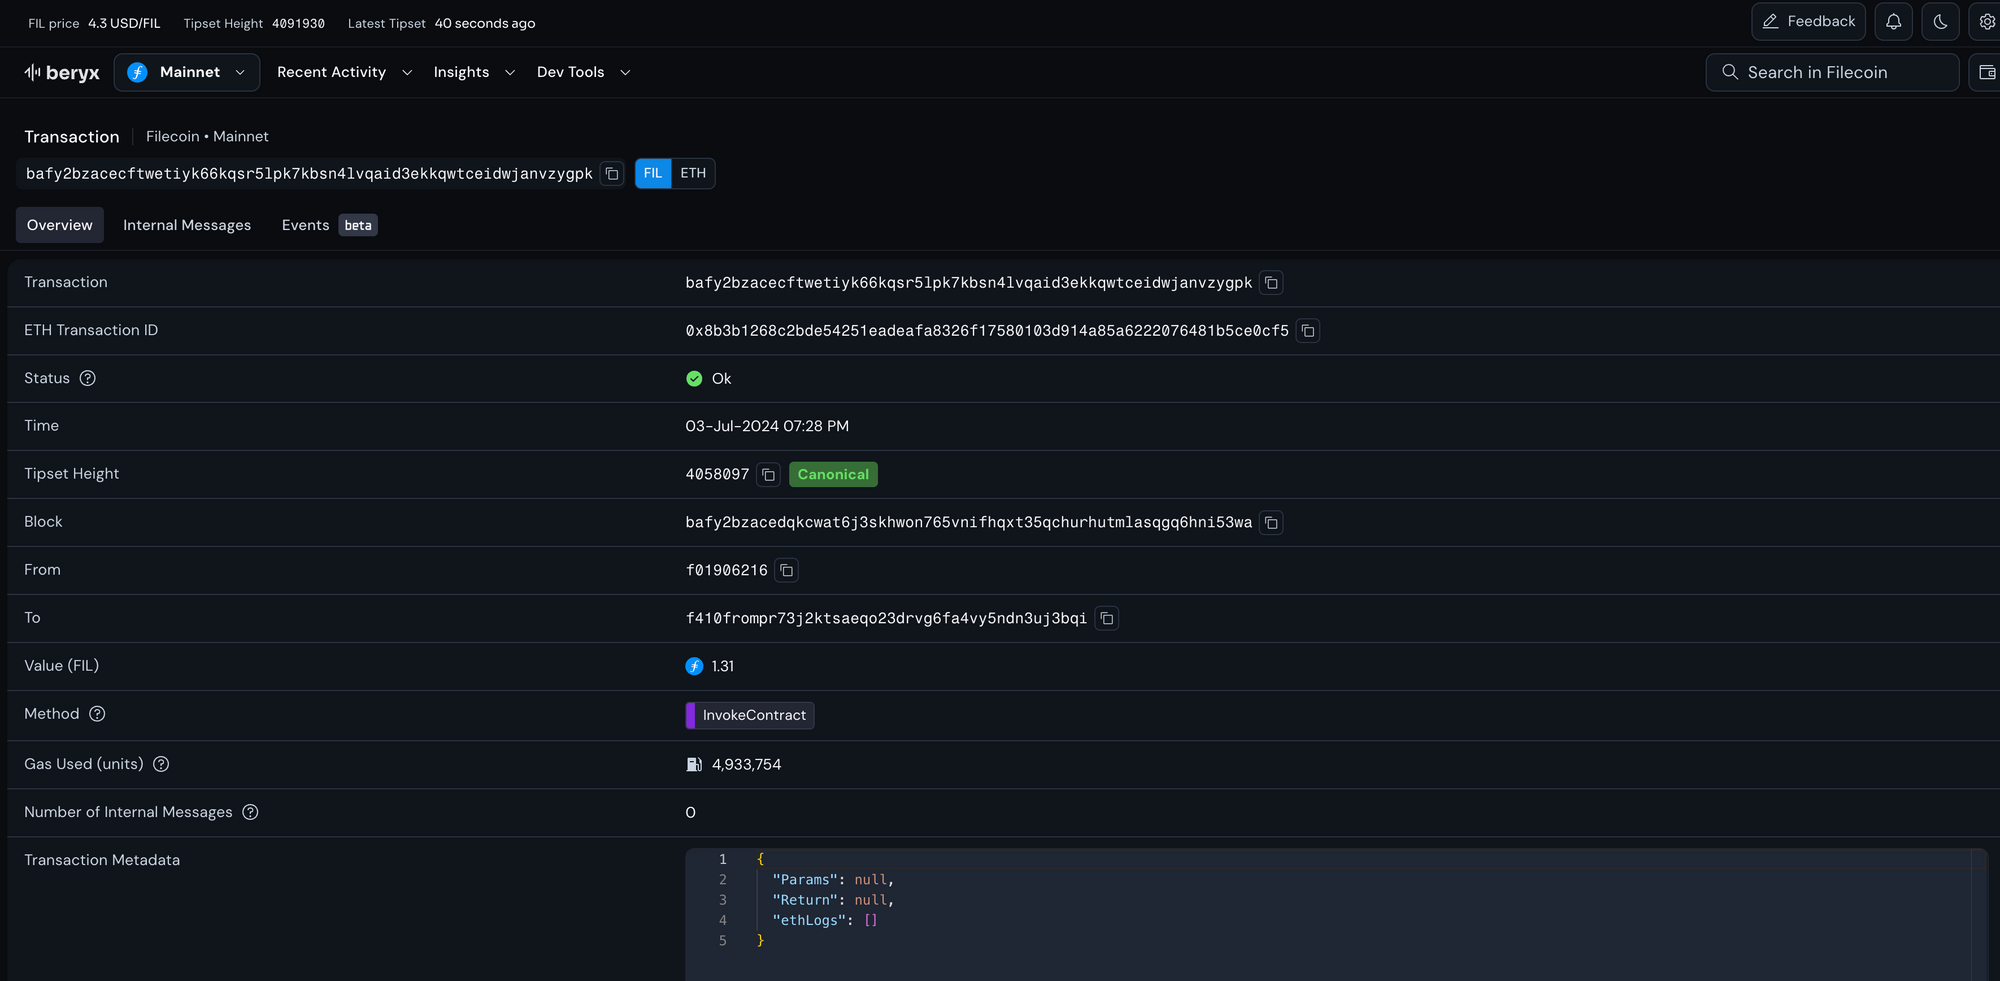
This is how a successful transaction looks
Deploying your ERC20 smart contract to the Filecoin Virtual Machine
To deploy our smart contract we need to go to:
https://remix.ethereum.org/
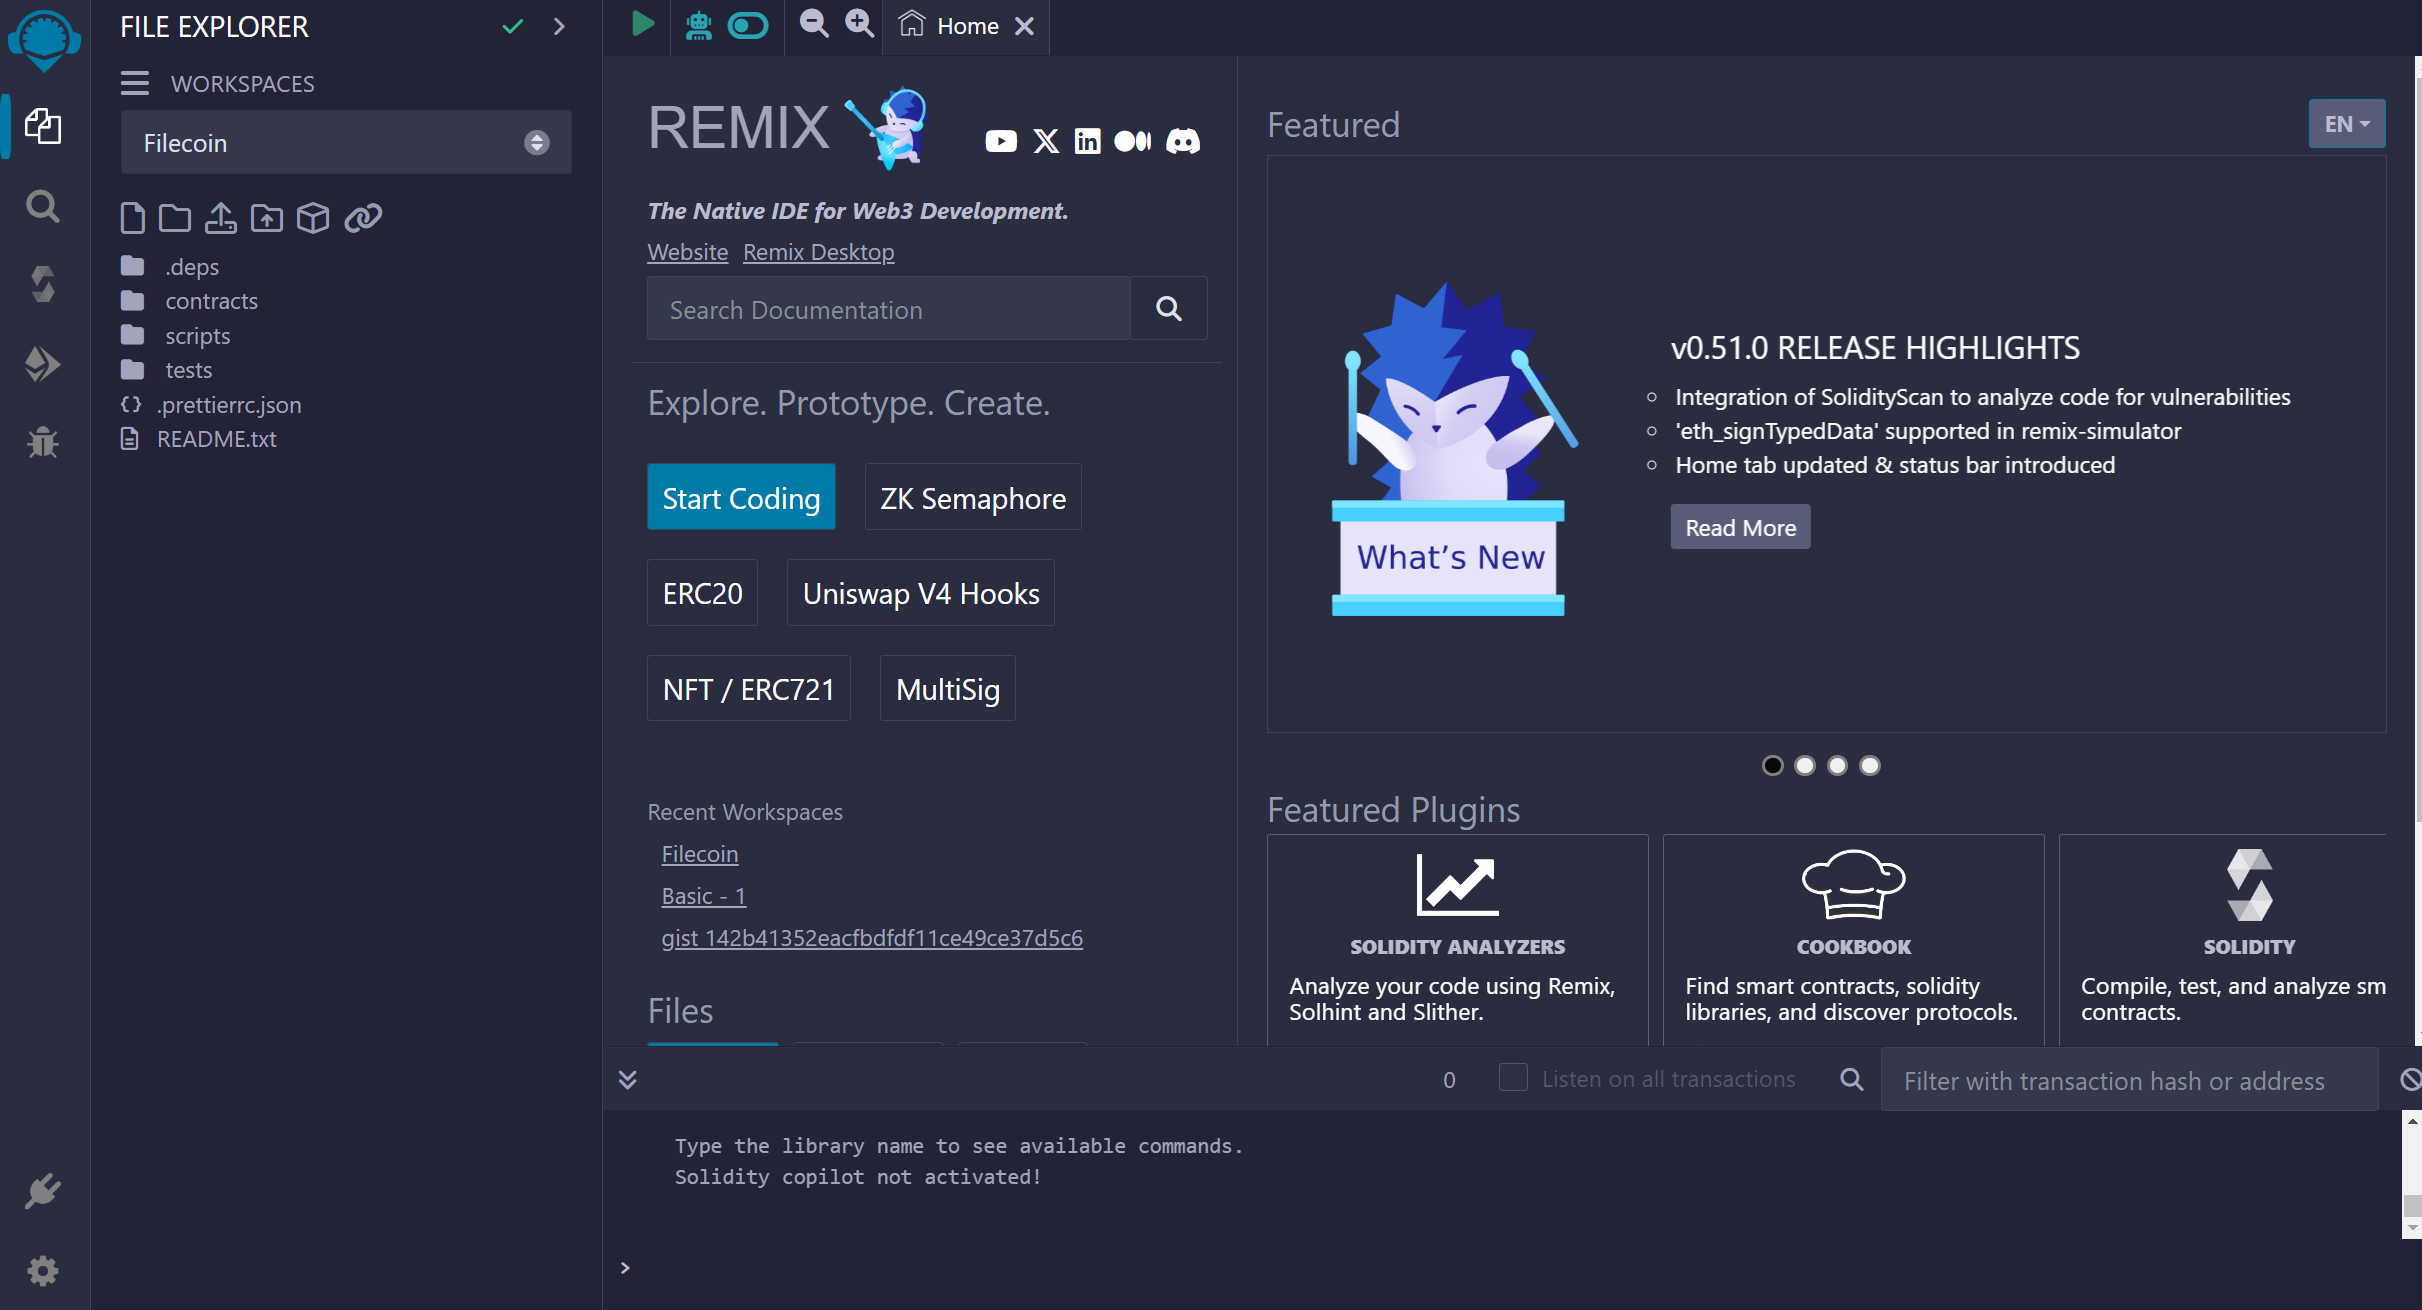
After that, create a file named MyCoin.sol inside the 'contracts' folder and paste the code obtained from OpenZepellin.
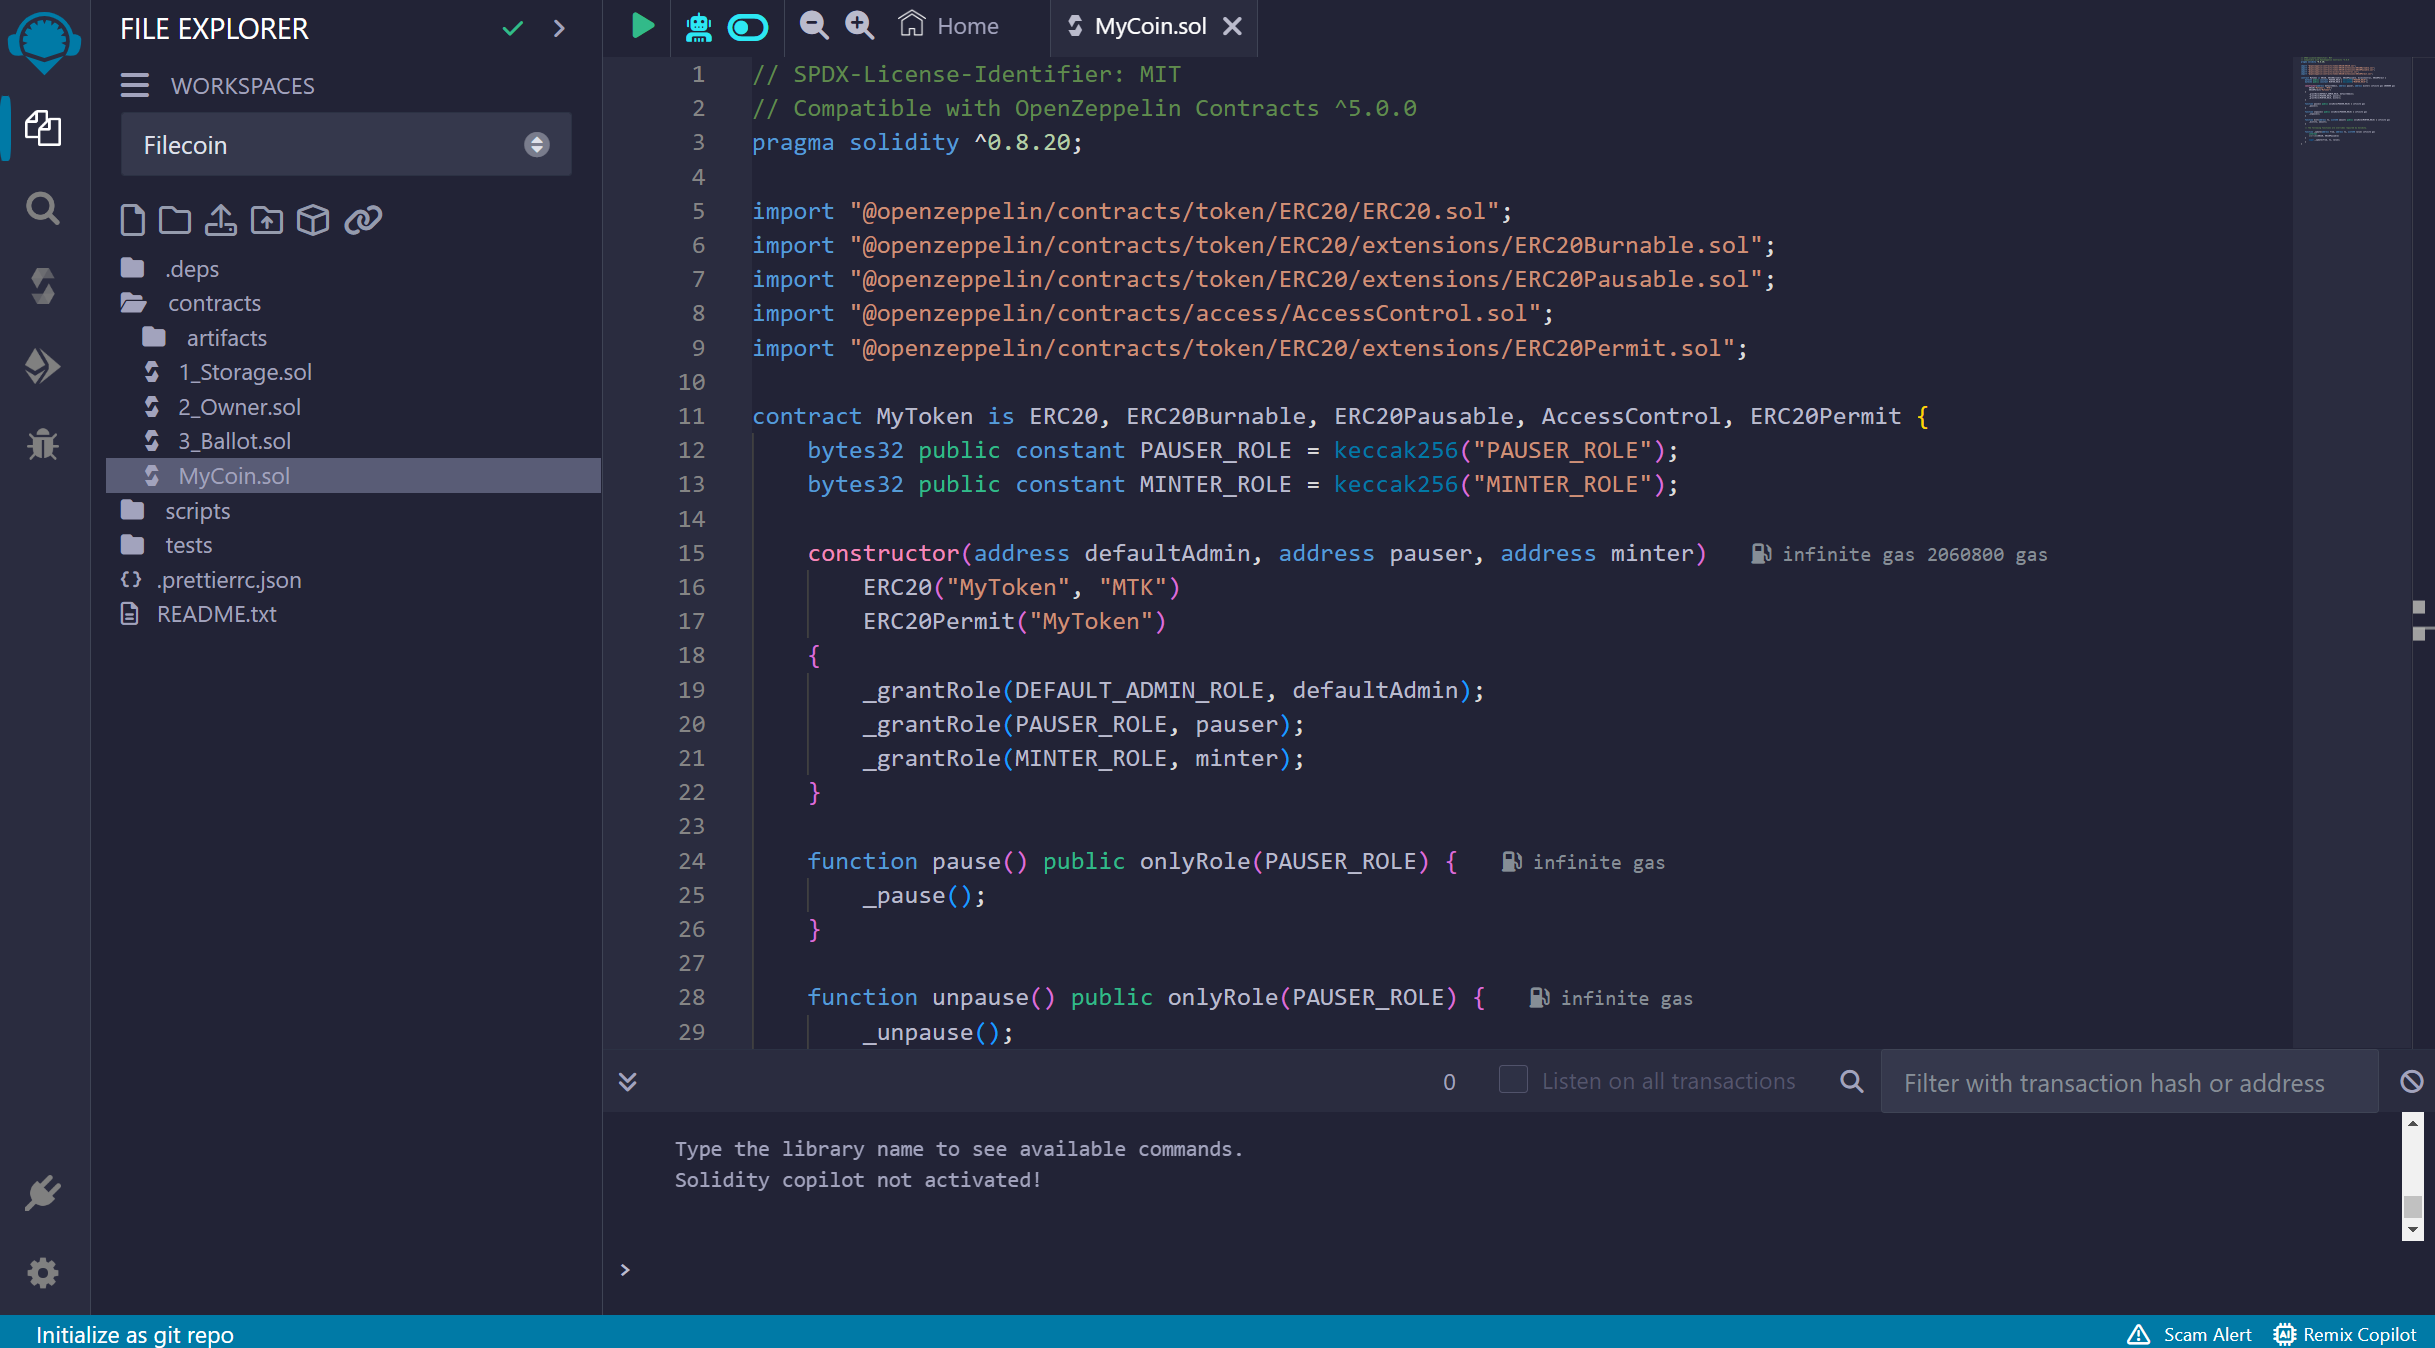
Next, compile the code in the left sidebar in the green section marked in the image, and click on "Compile MyCoin.sol".
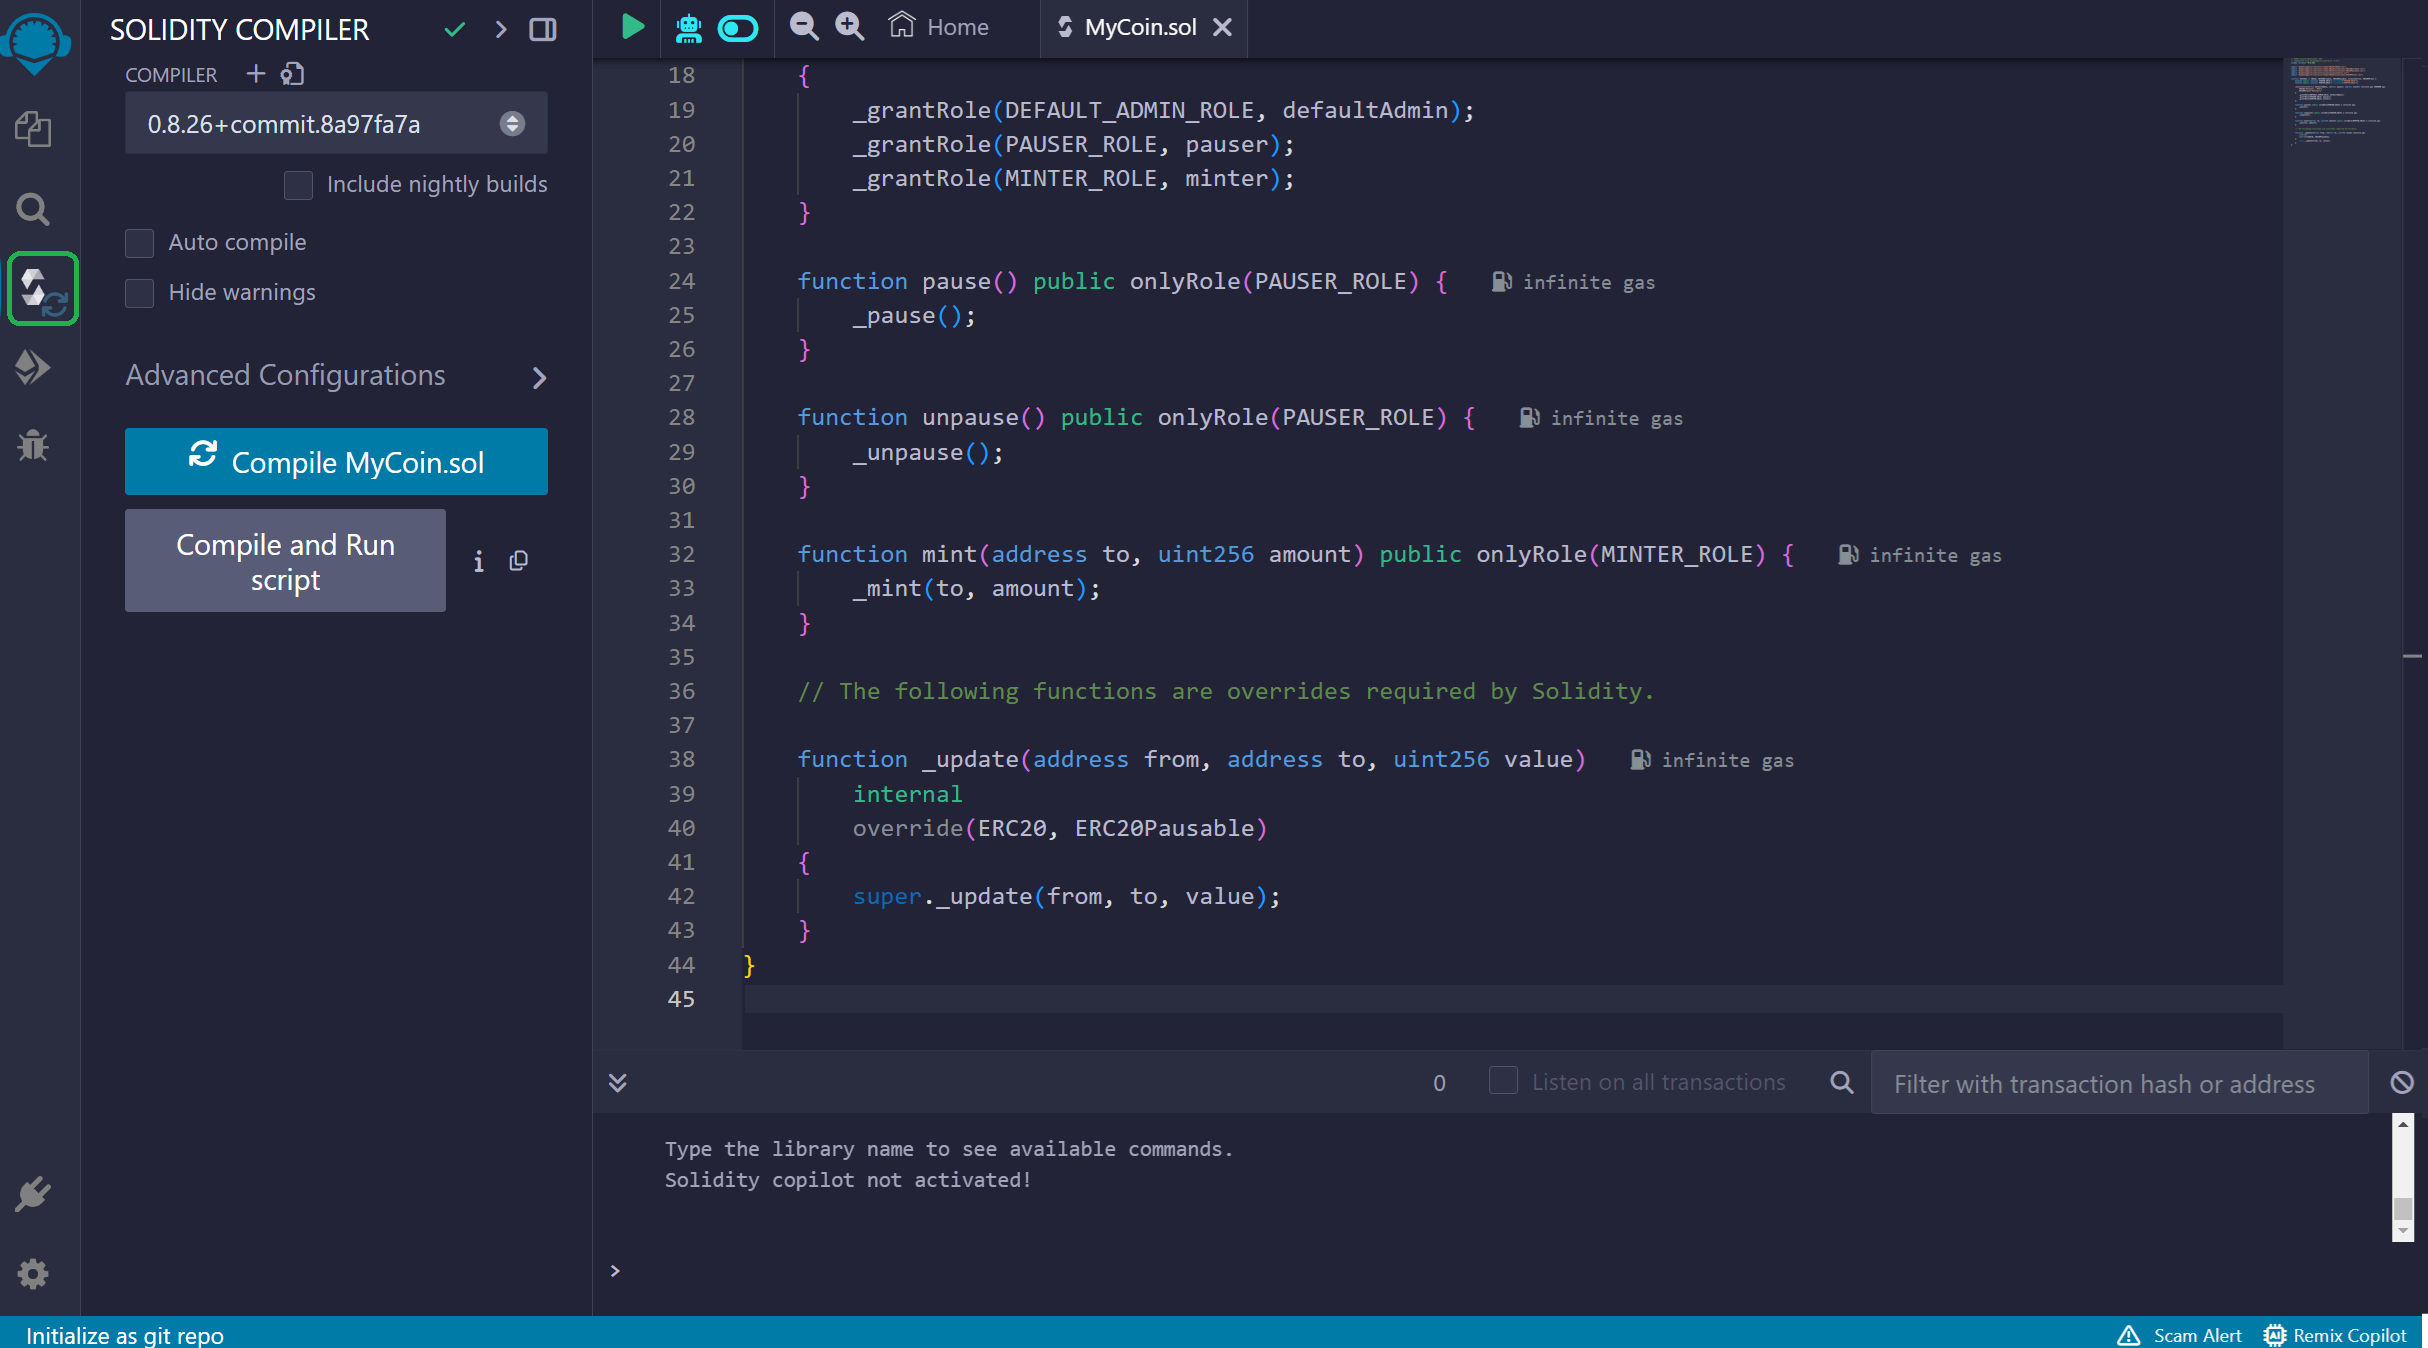
As a result, you'll see new options.
Scroll down and copy the: "ABI (Application Binary Interface)".
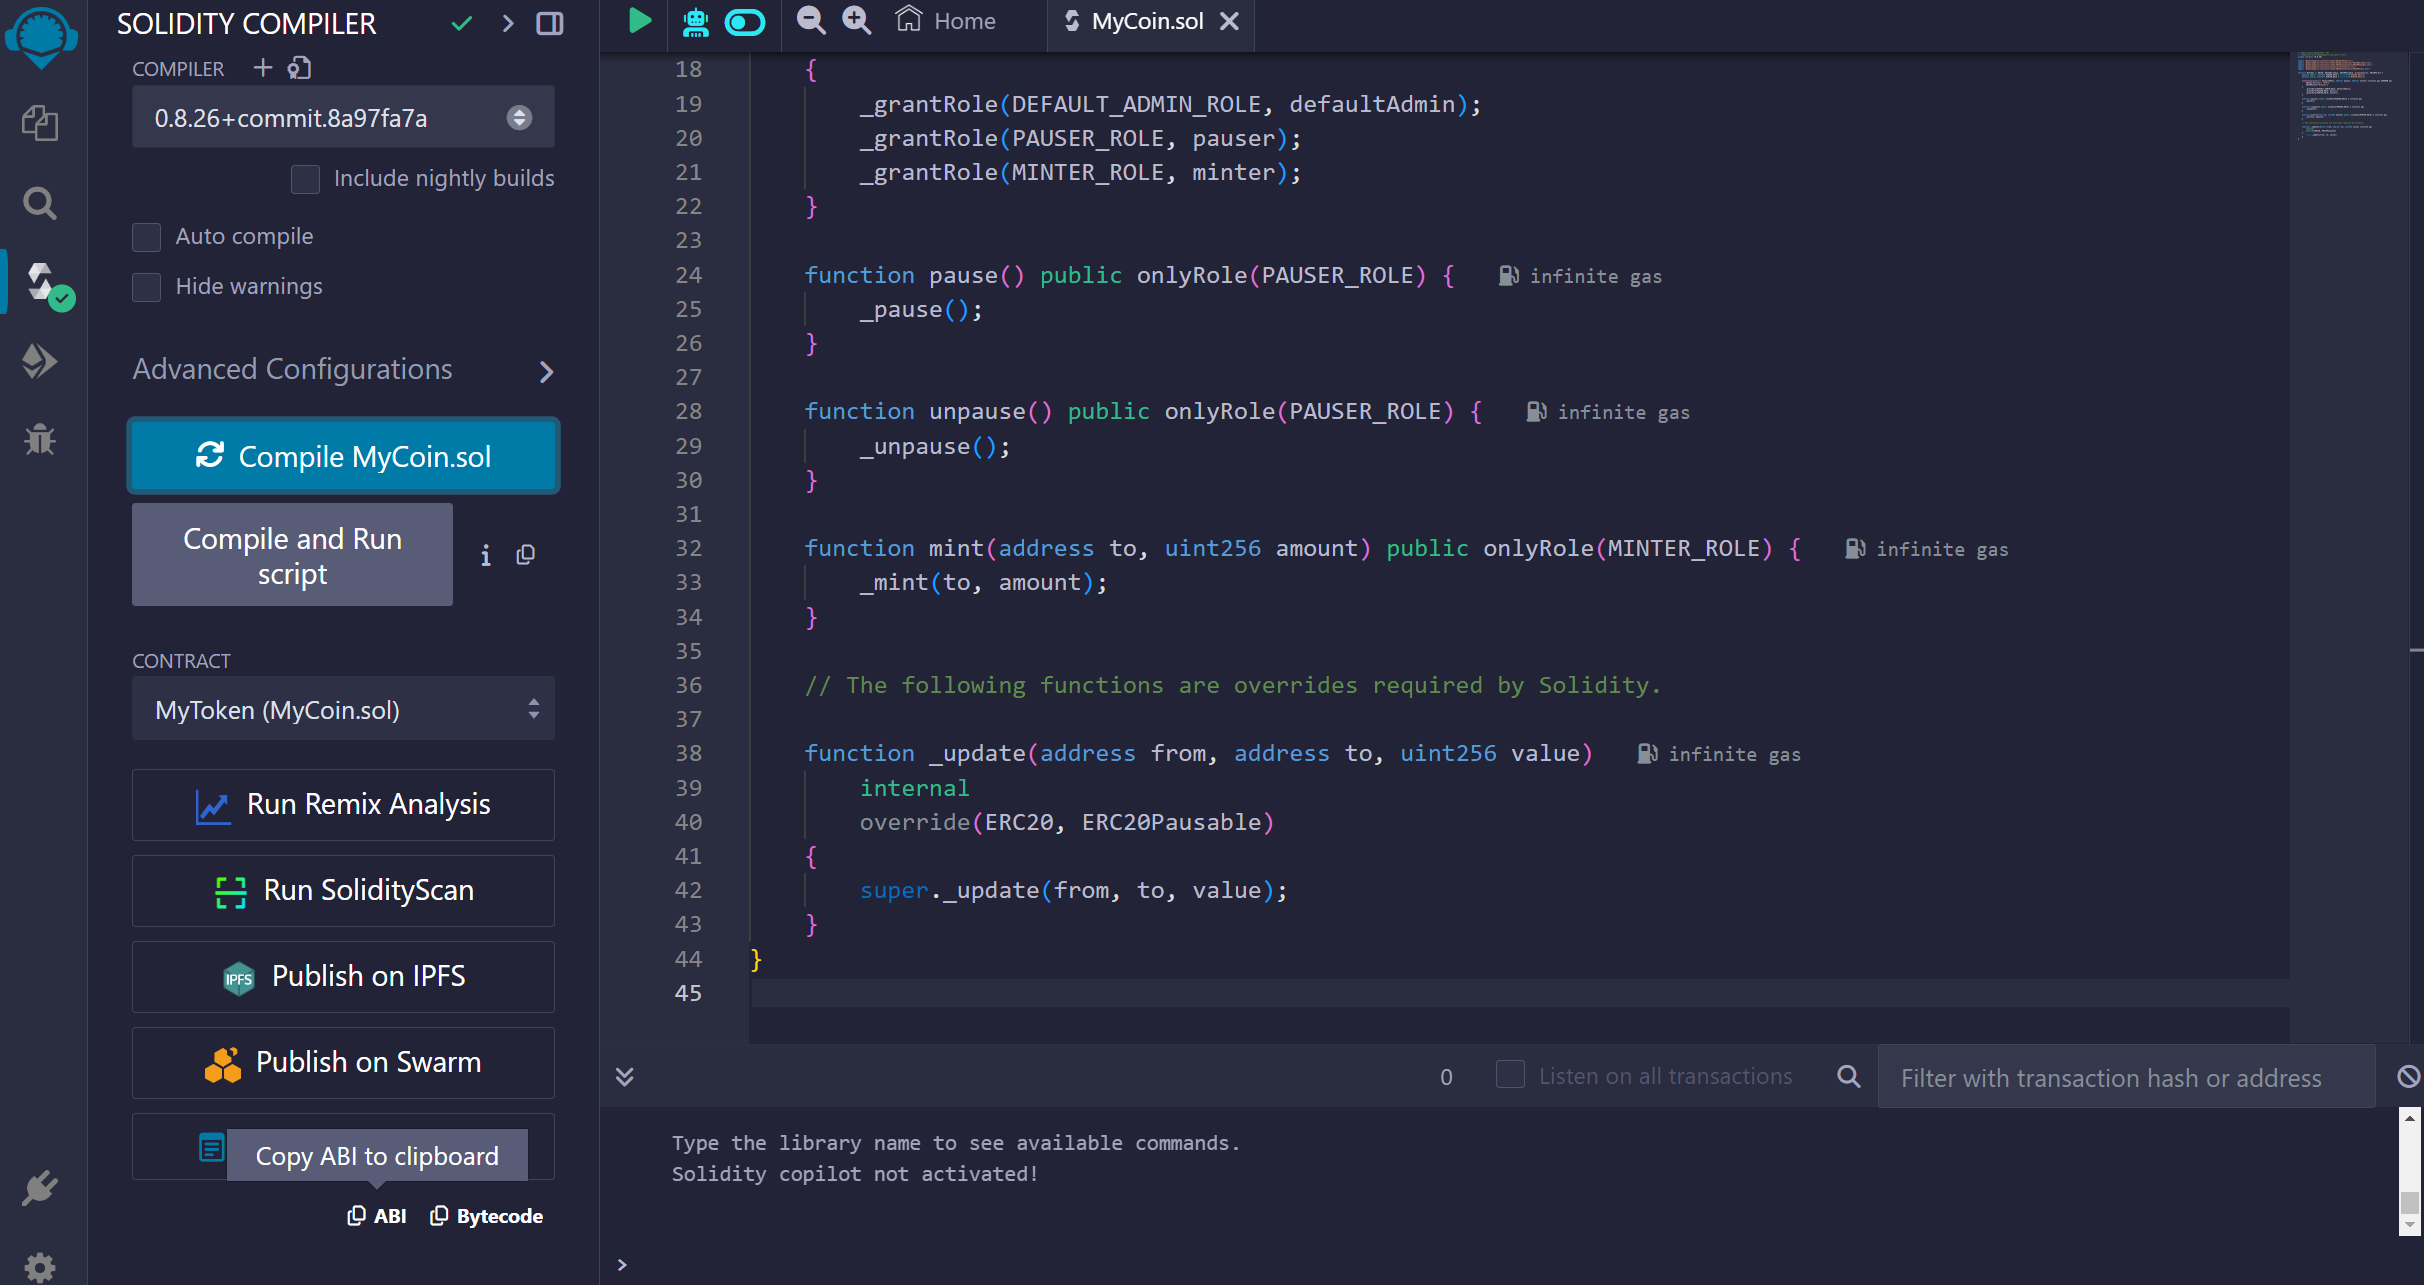
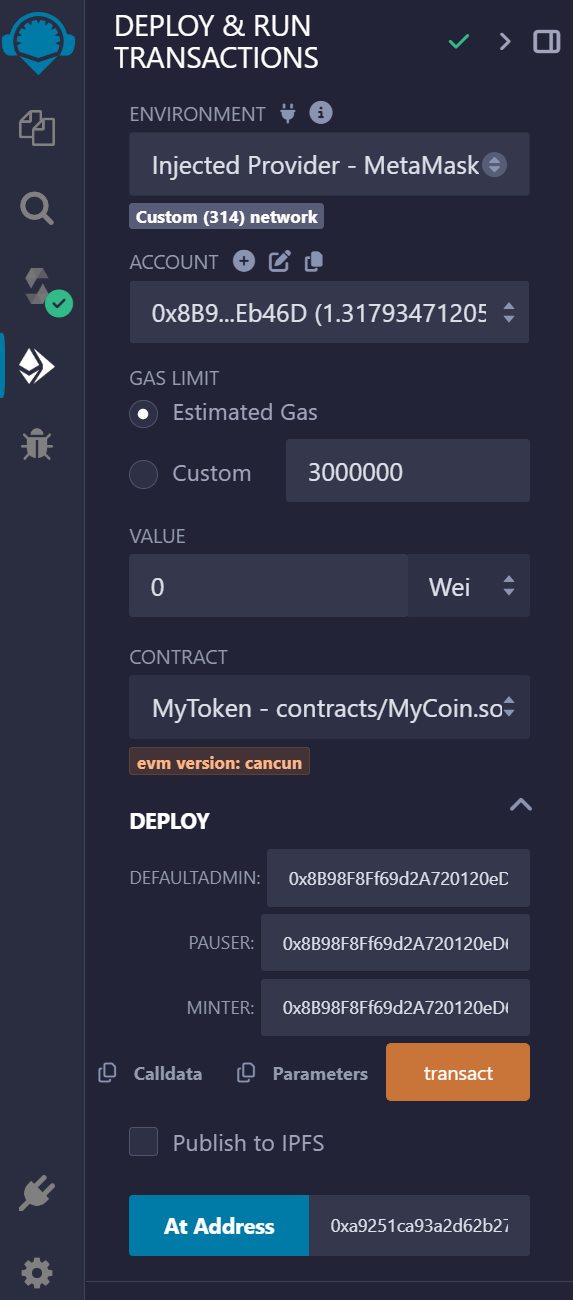
Then, go to the section where we will deploy our smart contract!
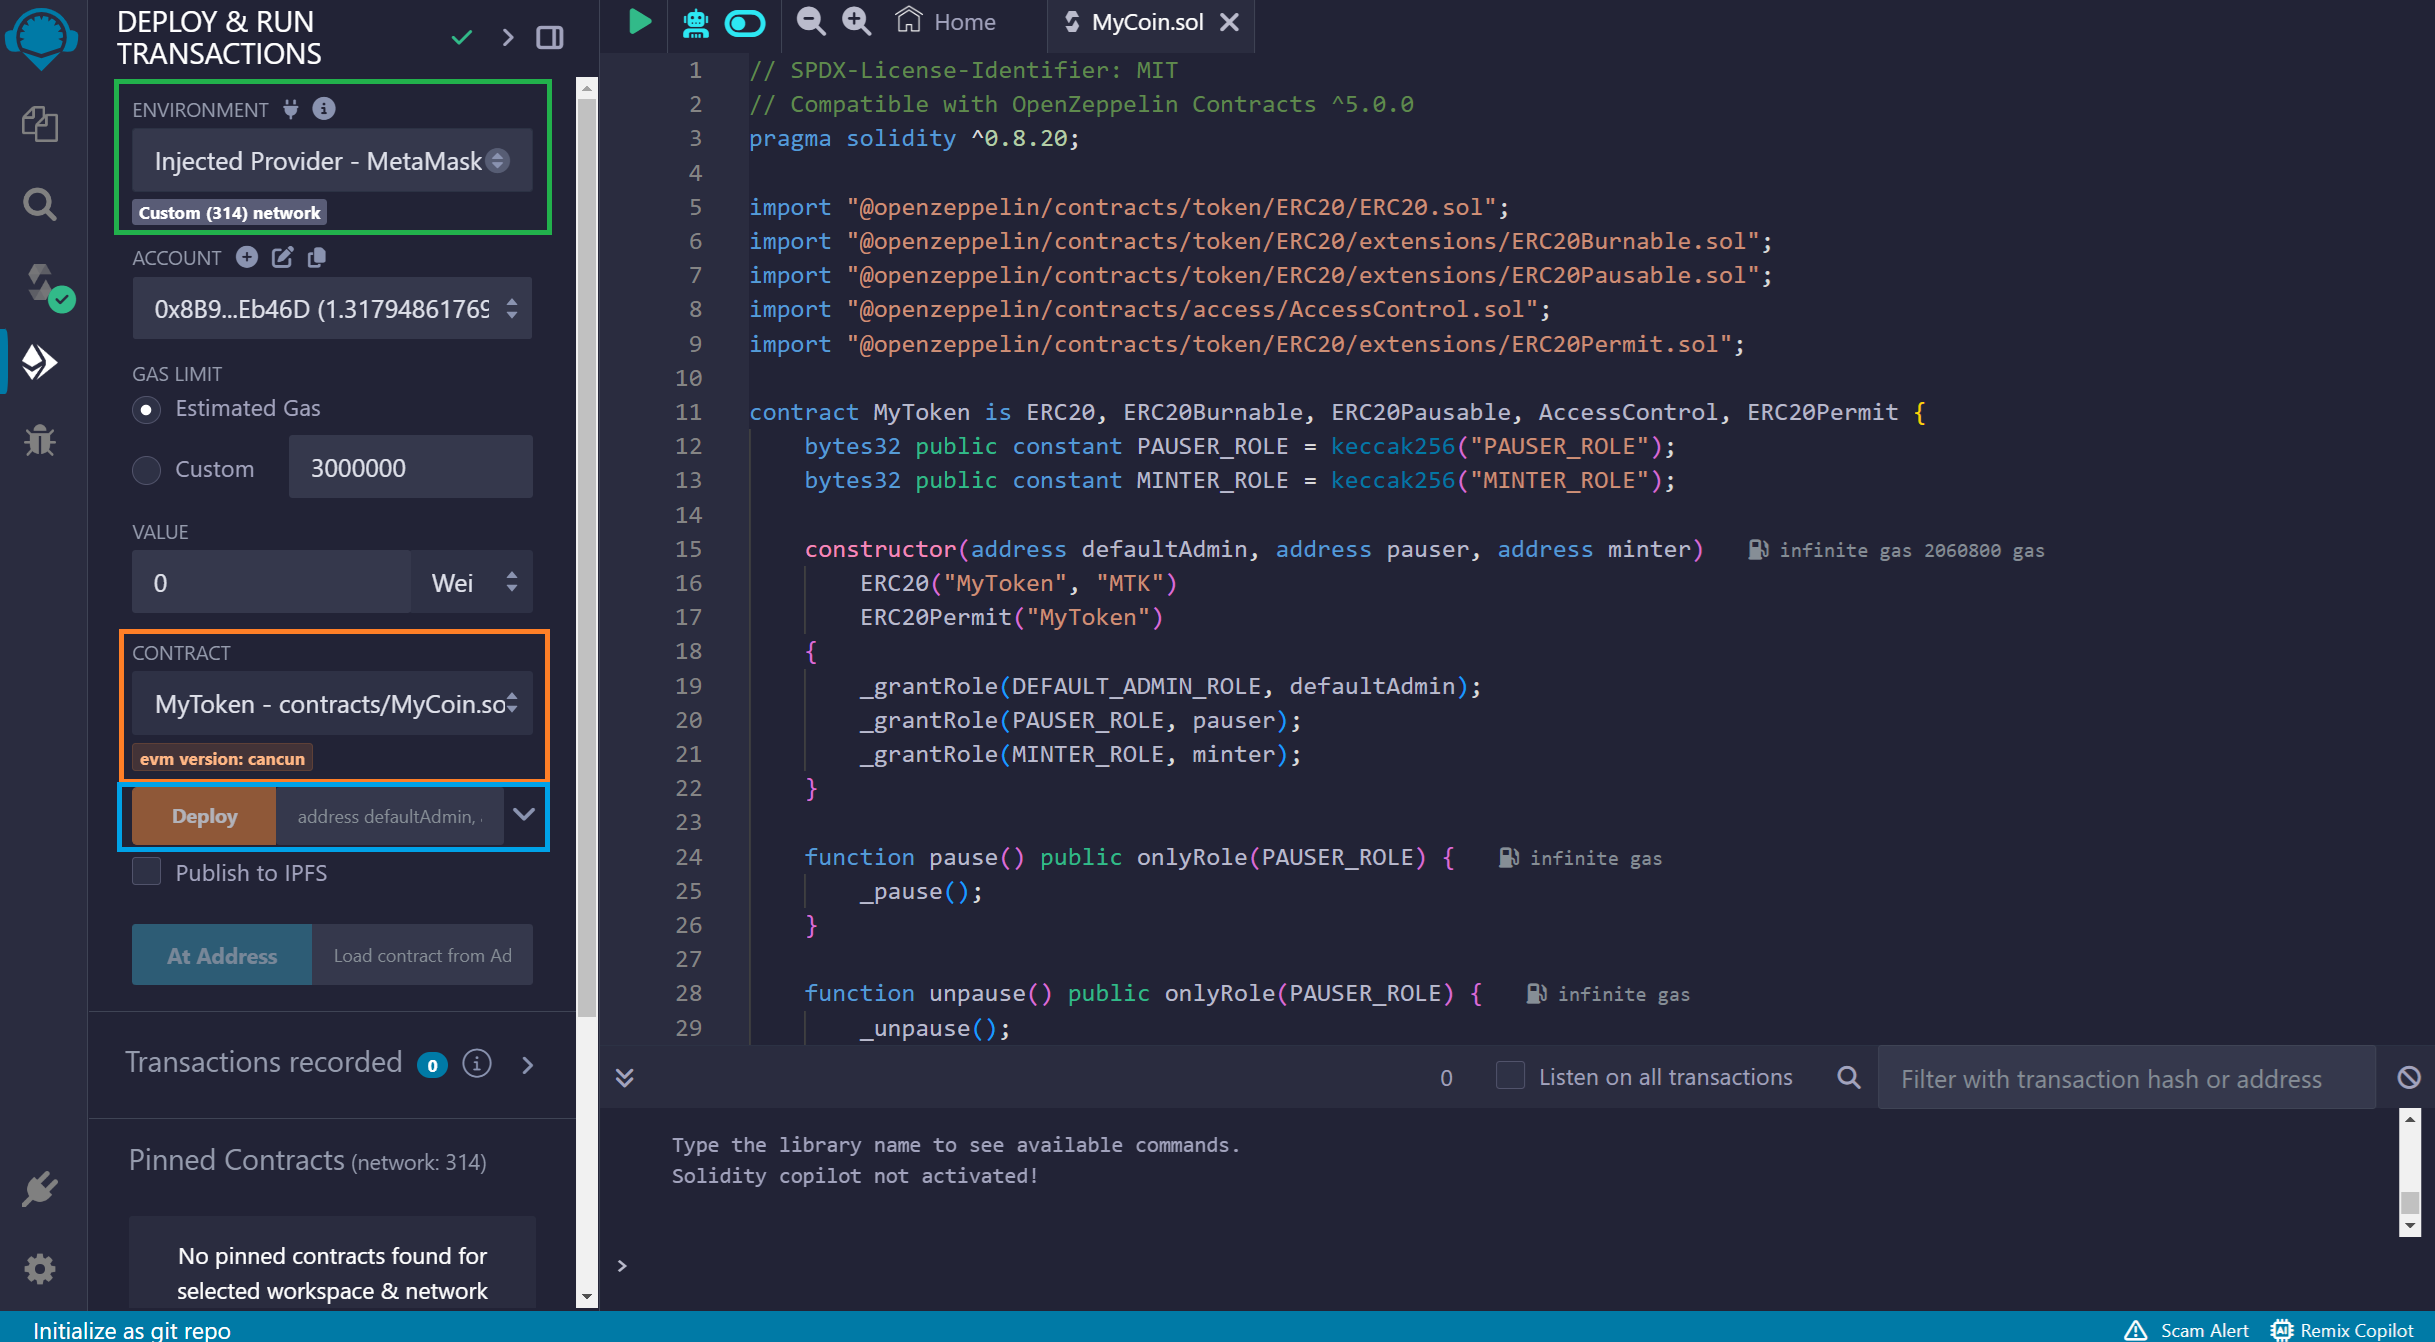
In the first dropdown "Environment" you need to change the option to:
"Injected Provide Metamask".
This will prompt Metamask later to deploy the contract.
In the second dropdown "Contract" you need to choose your contract. In this case, it's "MyToken"
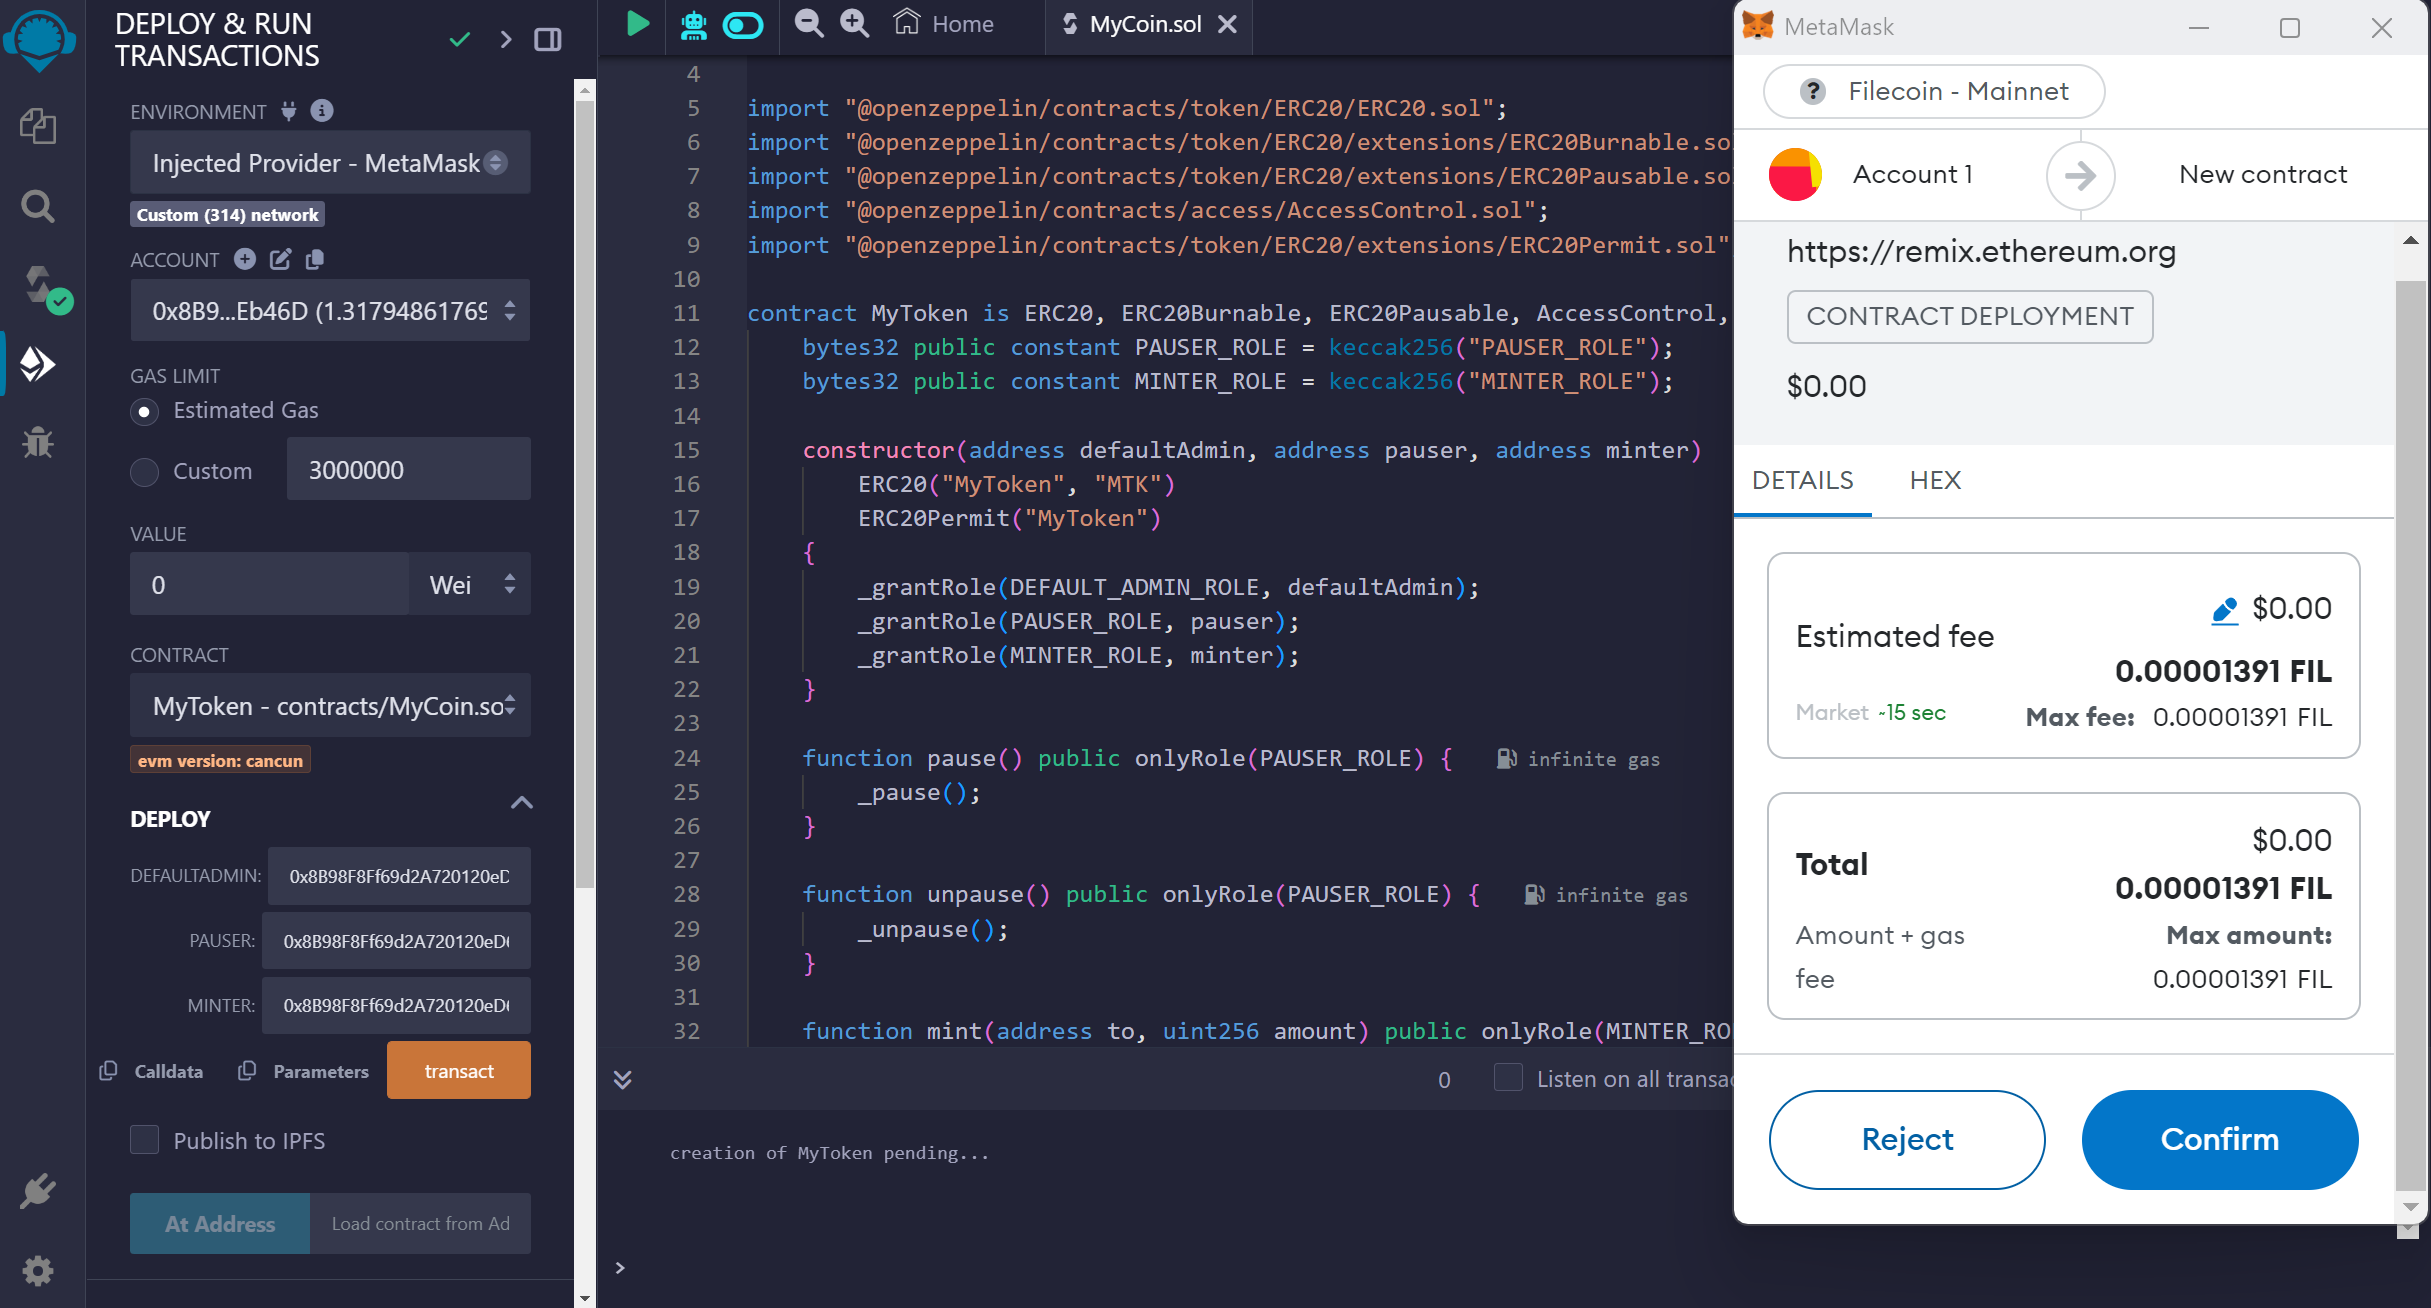
In the "Deploy" section, you need to fill each text box with your Ethereum address.
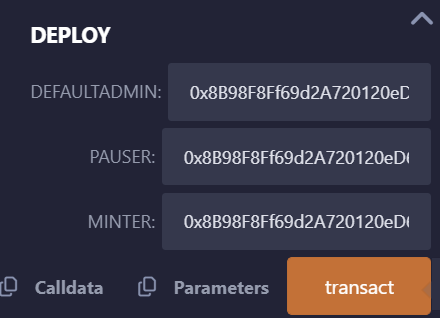
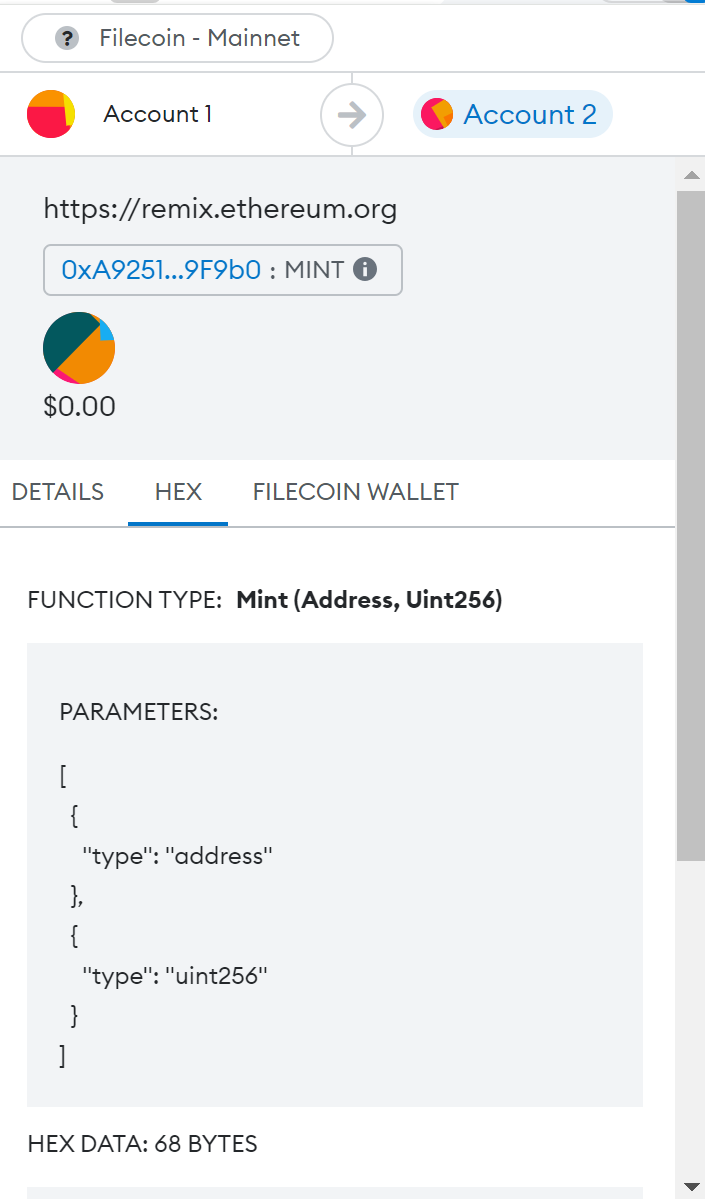
Then click on "Transact" to deploy the smart contract. The next window will display the fees associated with the transaction and other details on the "Hex Tab."
Click "Confirm".
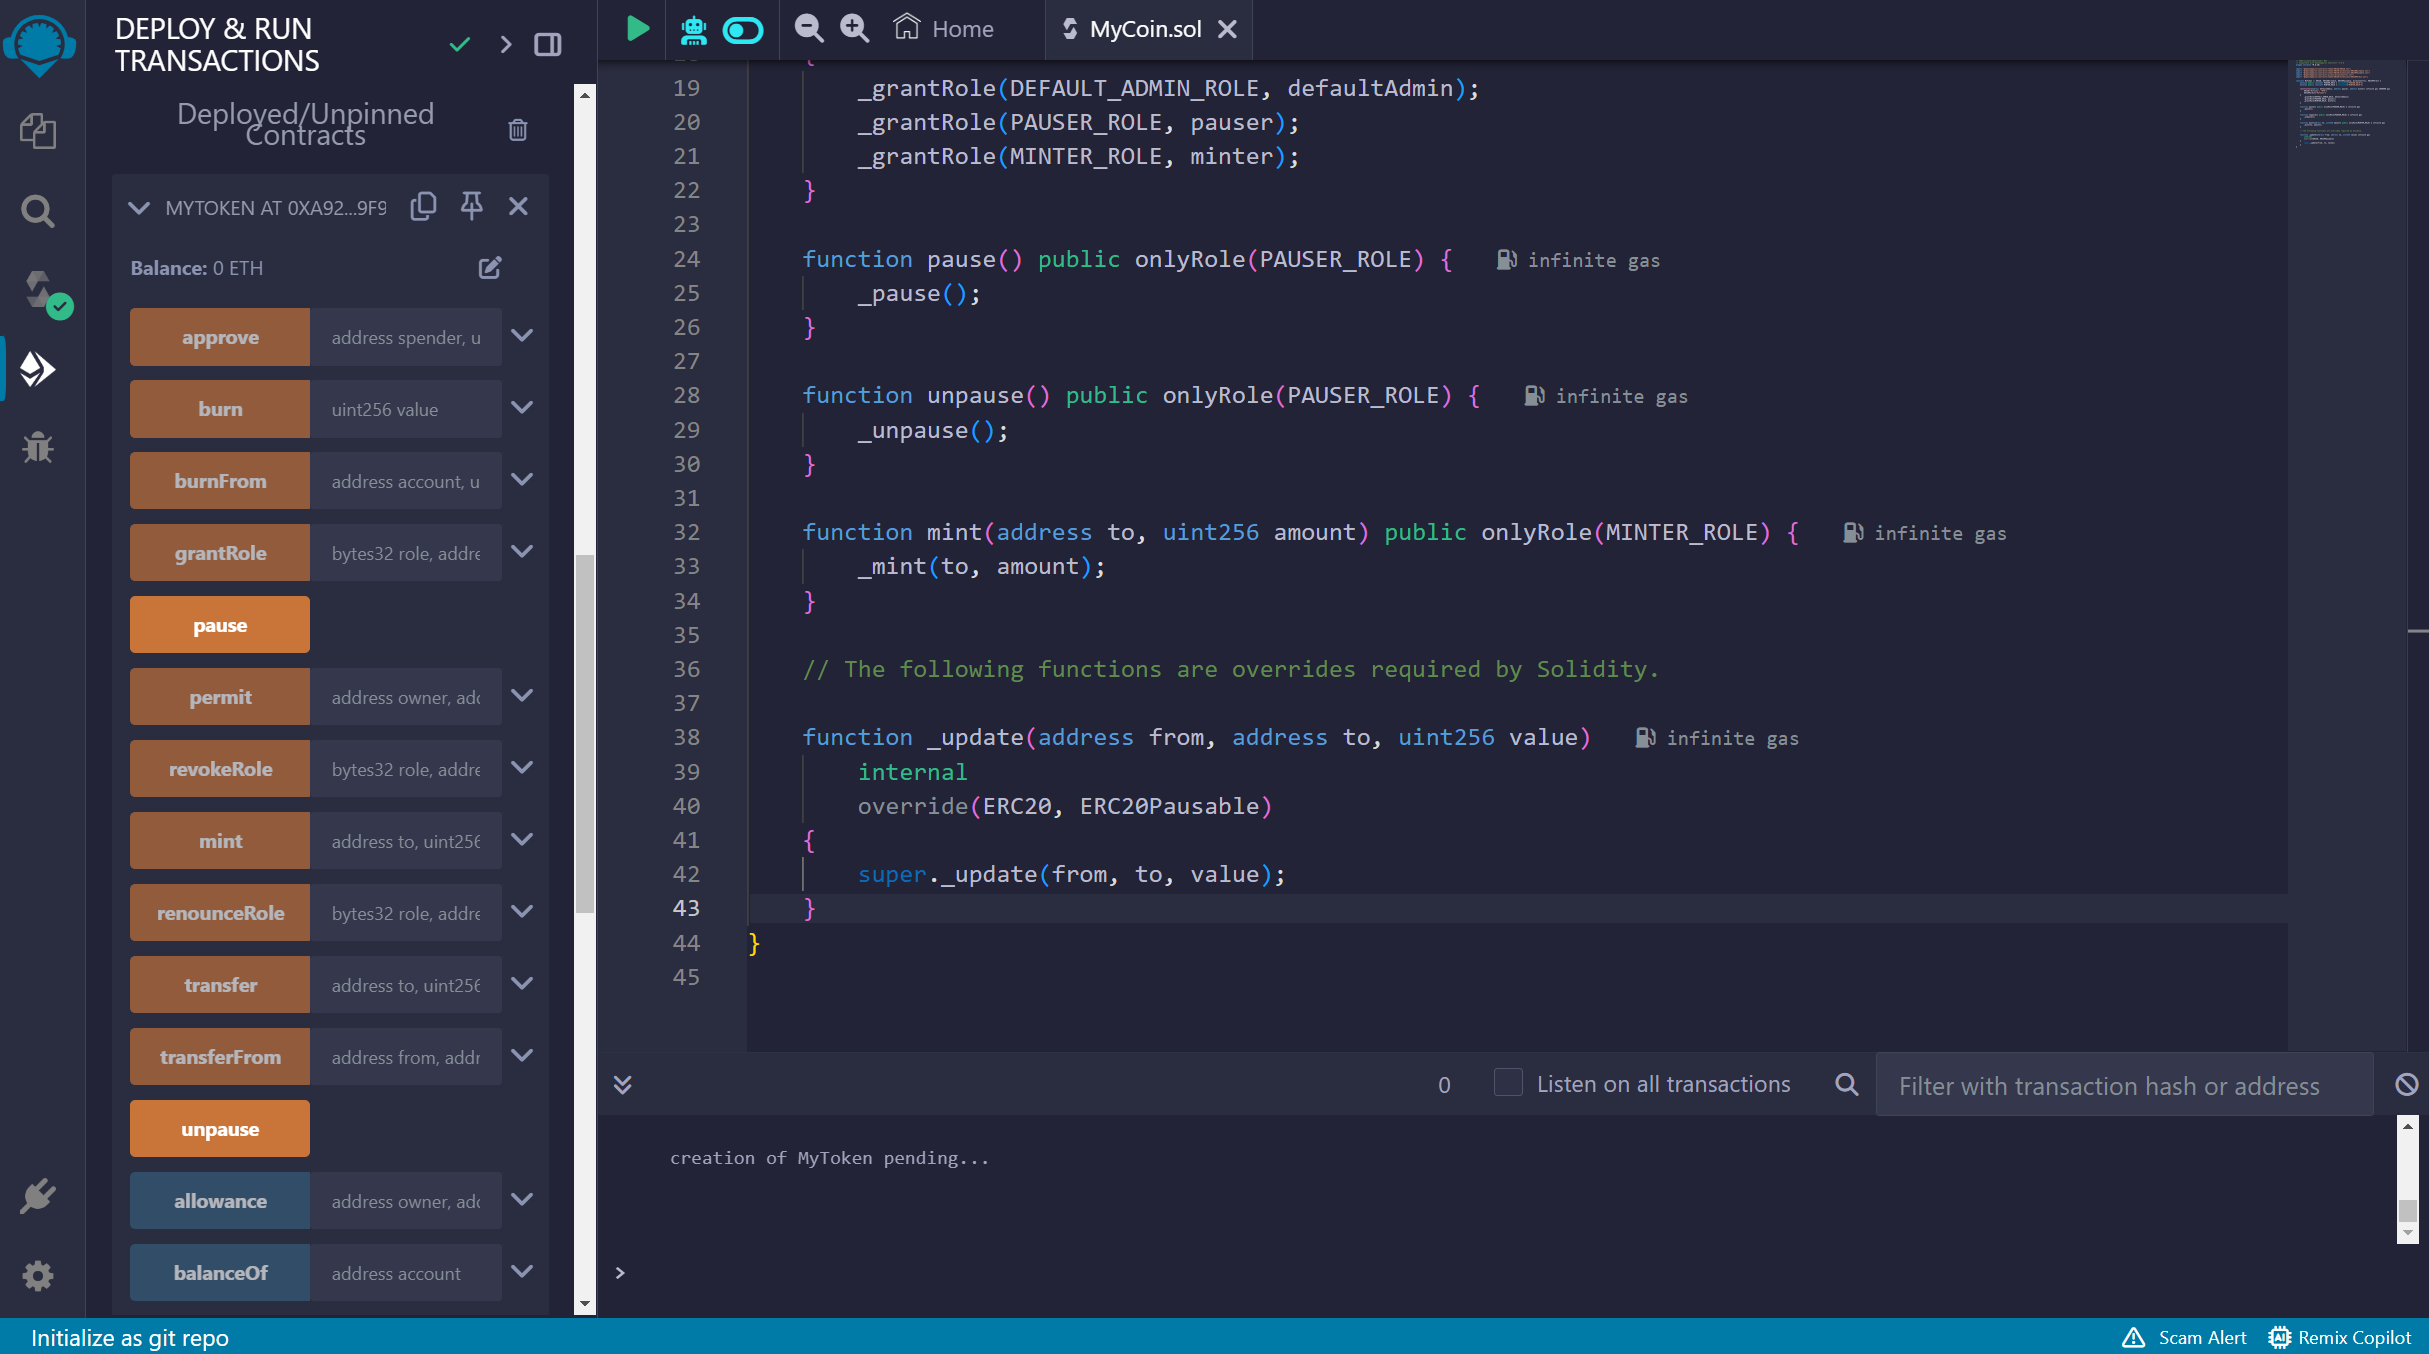
After deploying your smart contract, you'll see functions associated with the code in the new fields displayed below.
You can see the smart contract deployed on the Filecoin mainnet network here
Recovering smart contract address
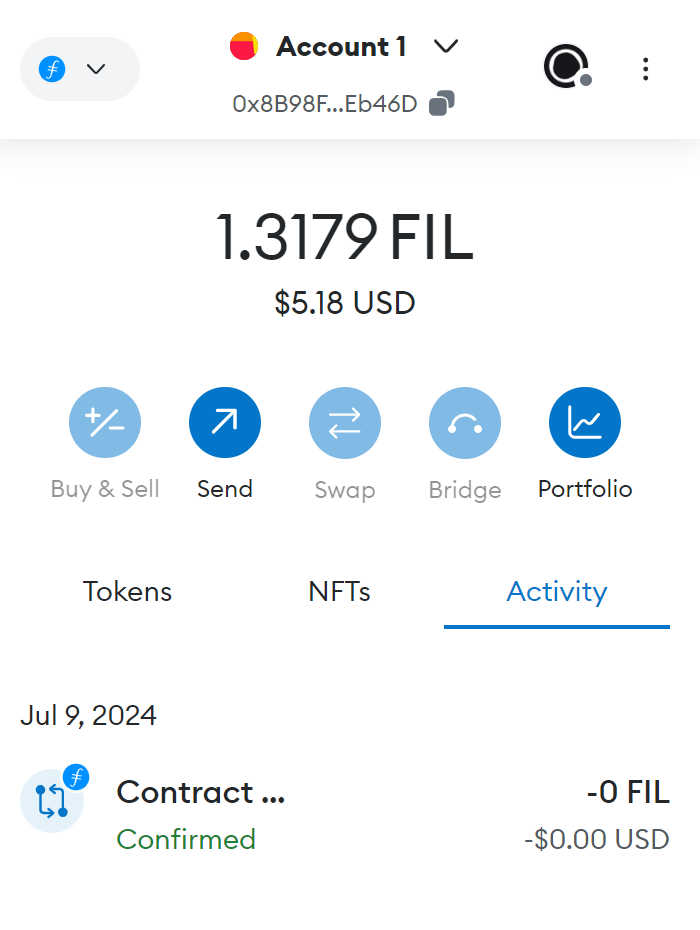
If the contract fails to render below or if you reload the page without saving your smart contract address, you can recover it through your MetaMask transaction history. Simply go to the "Activity" tab and click on the transaction.
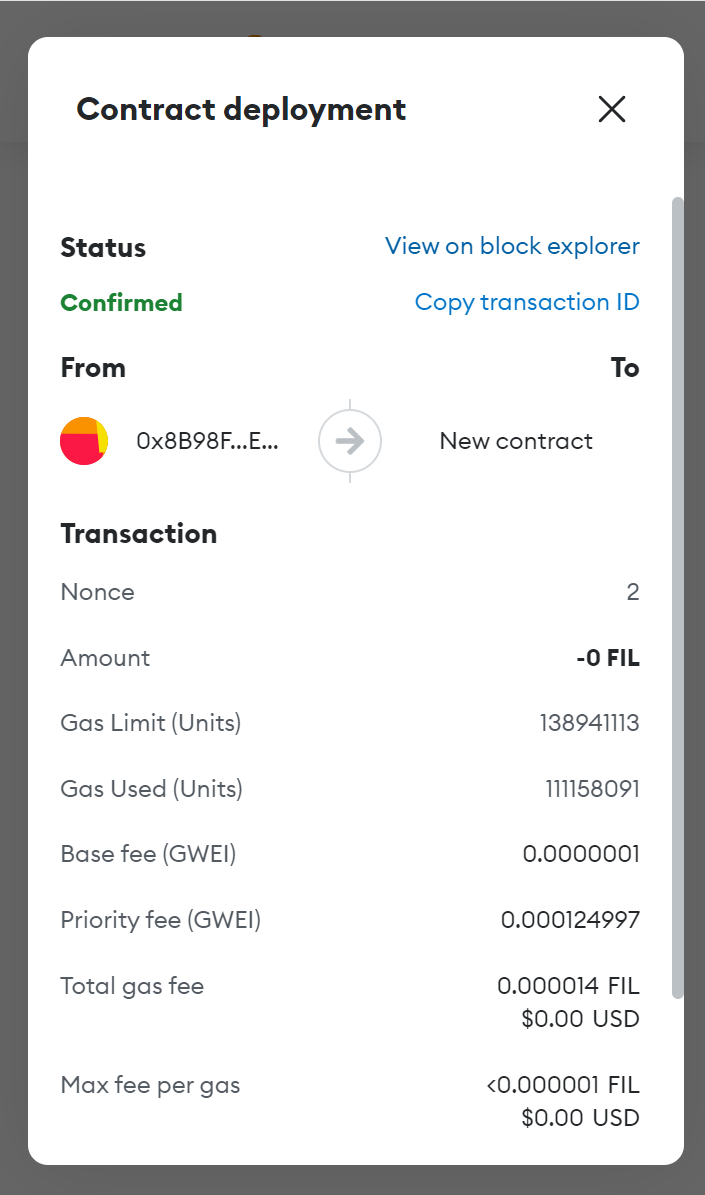
Then go to the transaction and click "View on block explorer".
Finally, you will see this block explorer.
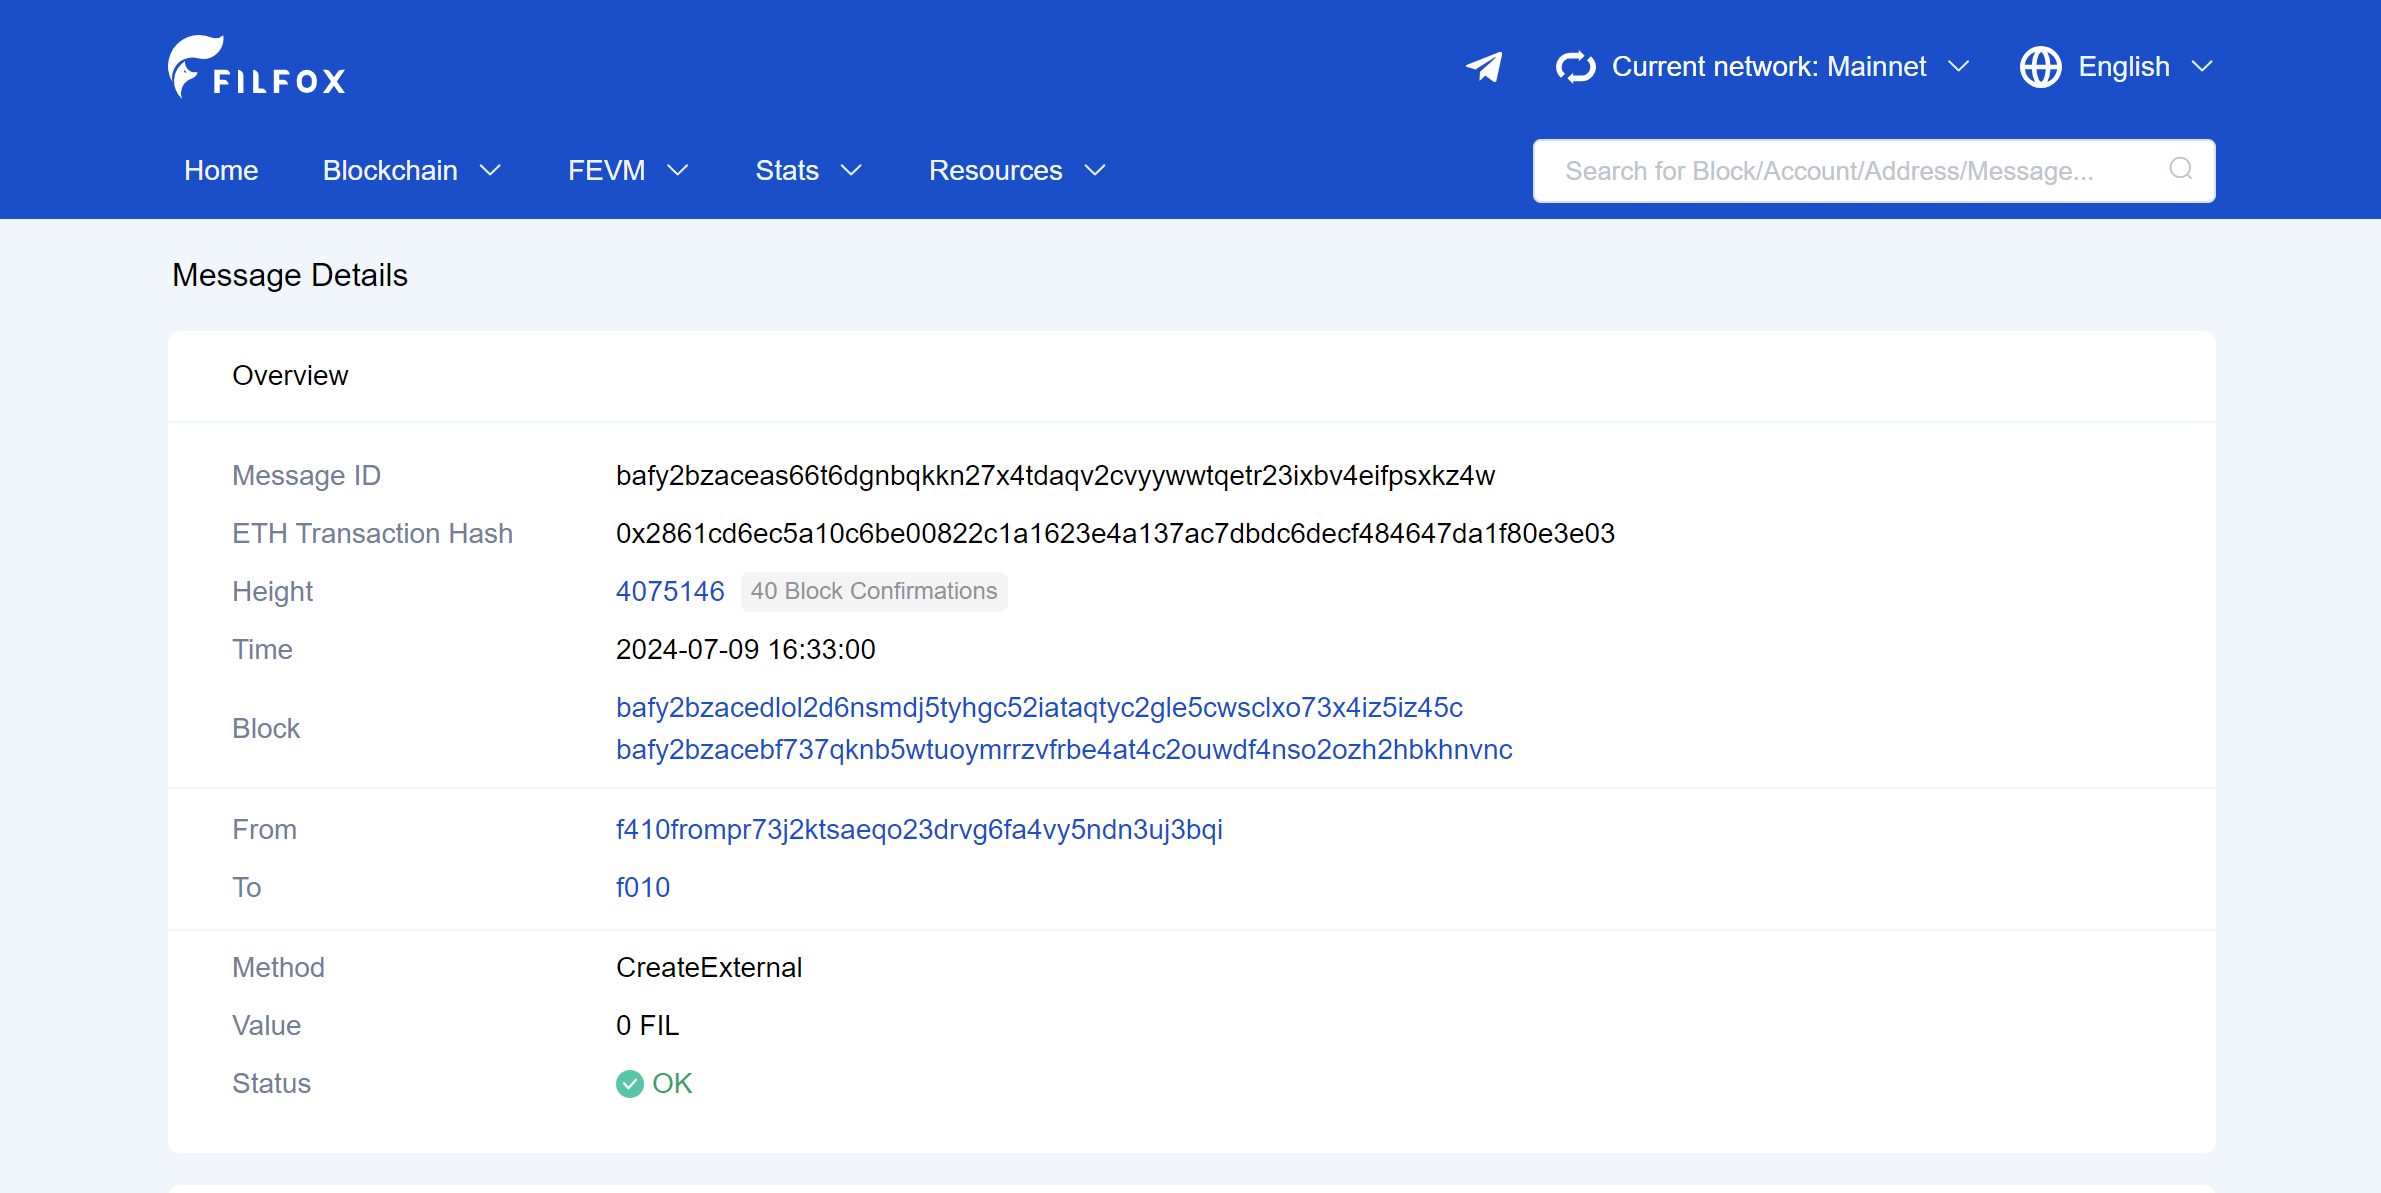
To find your smart contract address, search for the value labelled "EthAddress"
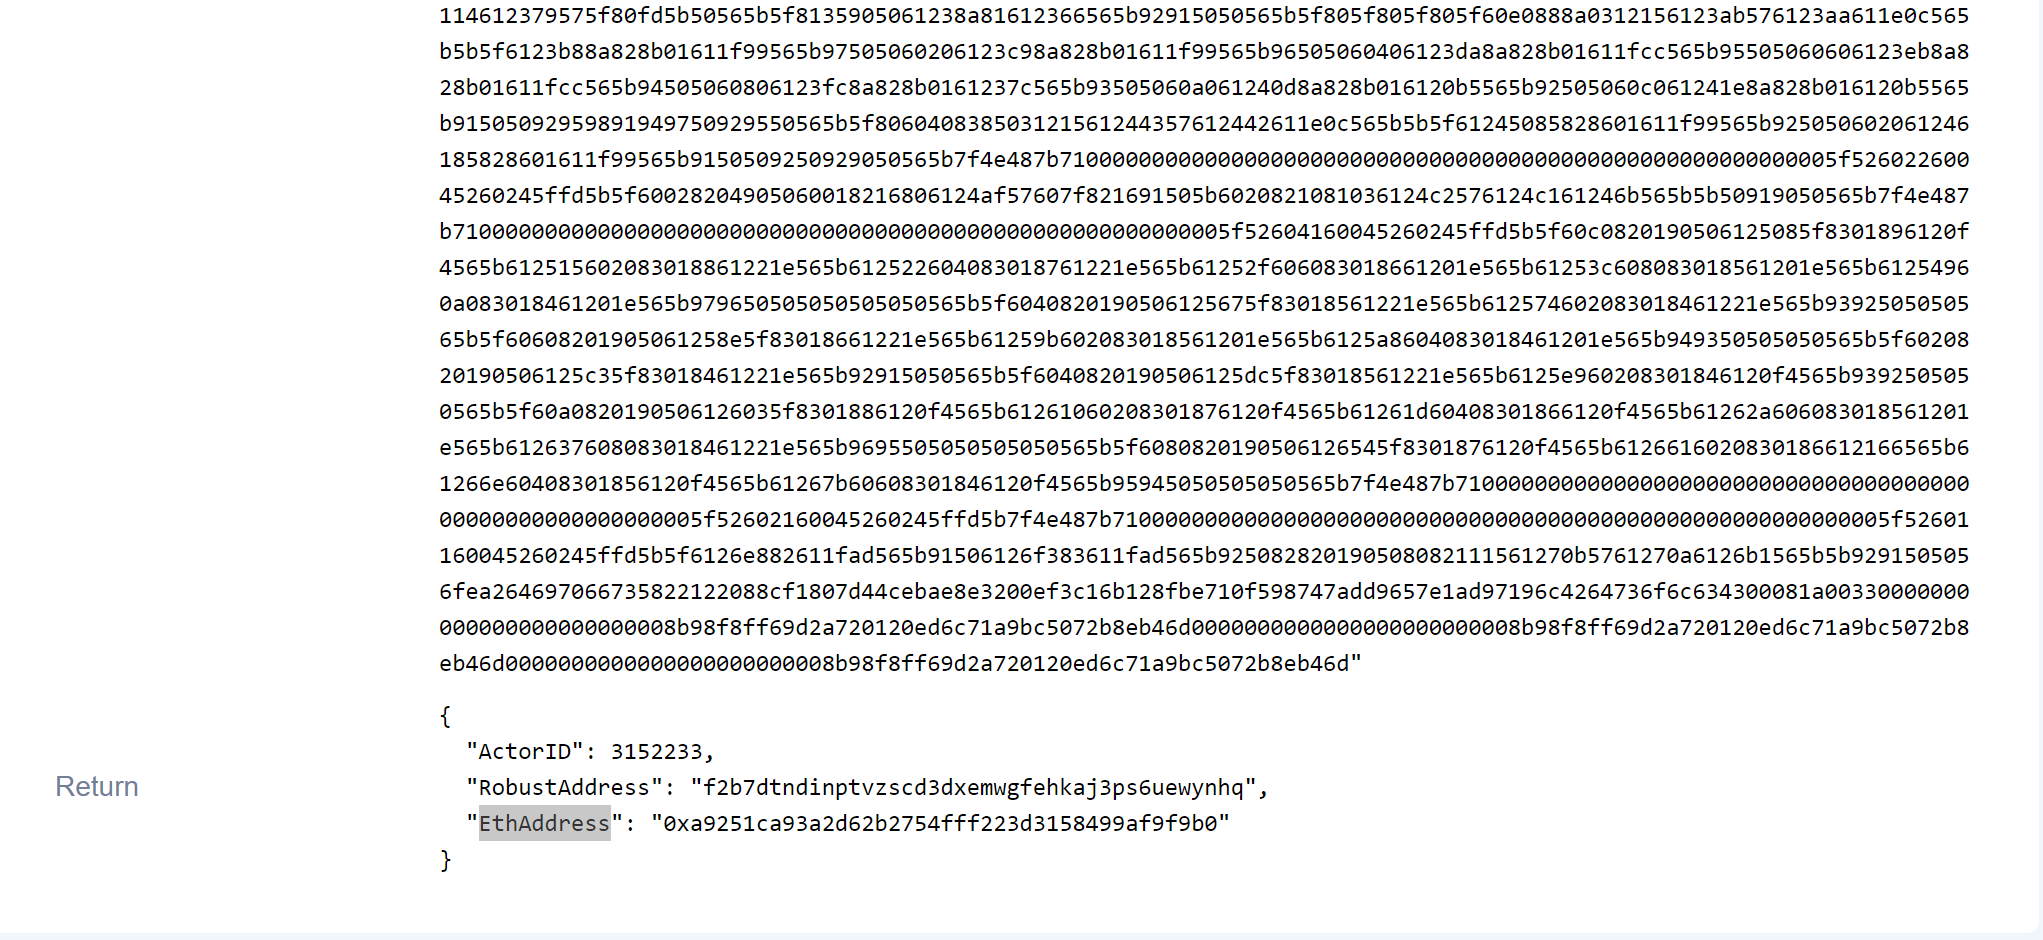
Now go back to Remix, paste the address in the "At Address" section, and click the button. Now you should have your smart contract methods.
Interacting with ERC20 tokens
First, we need to mint coins for our community. To do this, use the "mint" method and provide the following parameters:
to: The recipient's address.
amount: Specify the amount of tokens you wish to mint, denoted in wei.
Wei is the smallest denomination of ether, the cryptocurrency on the Ethereum network. It's important to express amounts in wei when interacting with Ethereum smart contracts, as it ensures precision in token transfers and calculations.
To convert your number to wei, you can use a method or tool like eth-converter
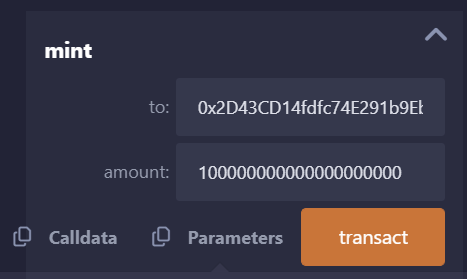
Now, a Metamask prompt will ask you to confirm the transaction.
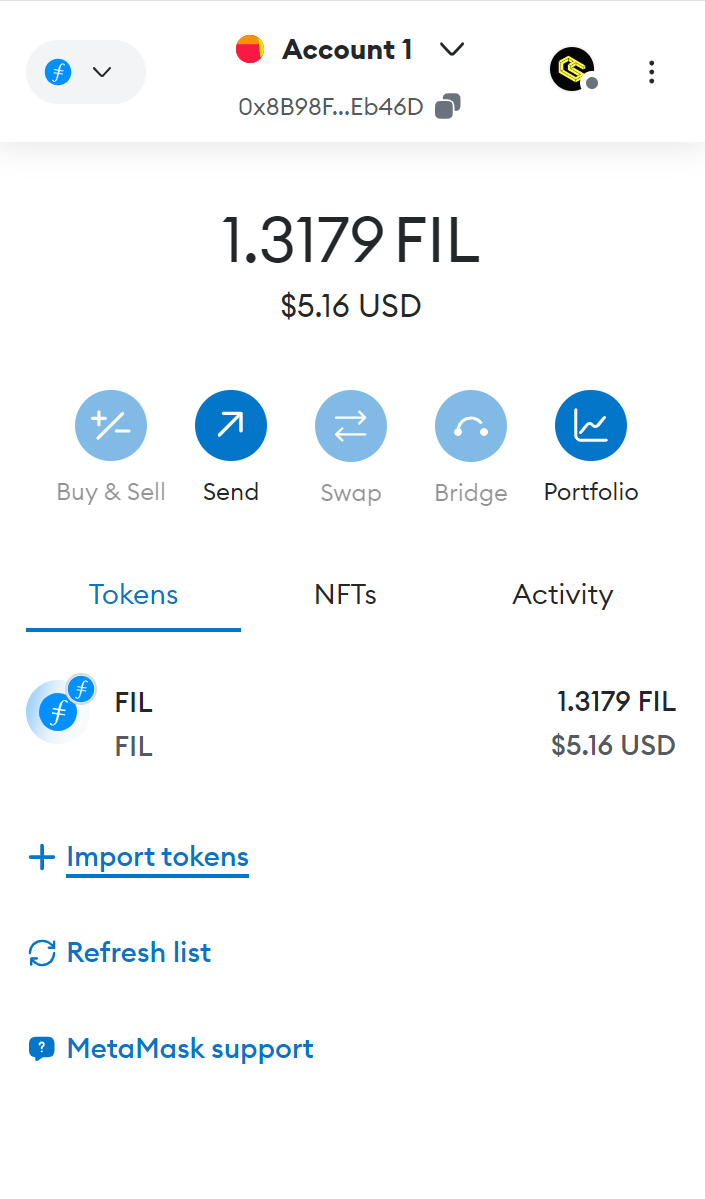
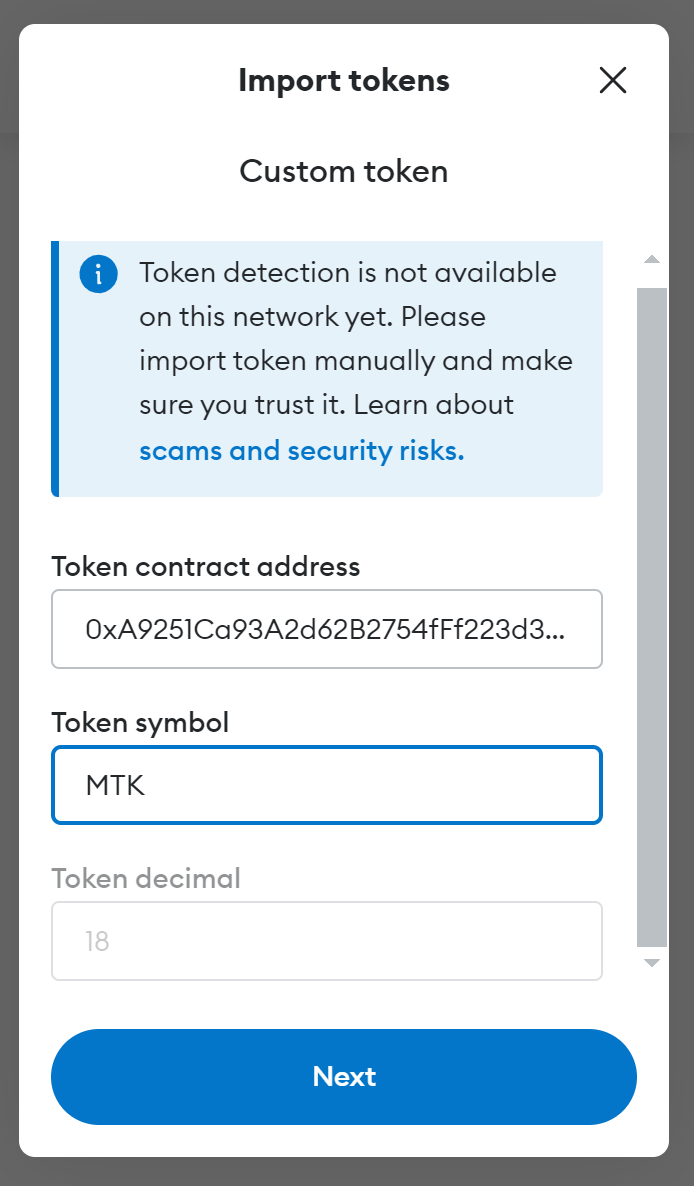
Now, to see your wallet balance, you need to add this token to your Metamask.
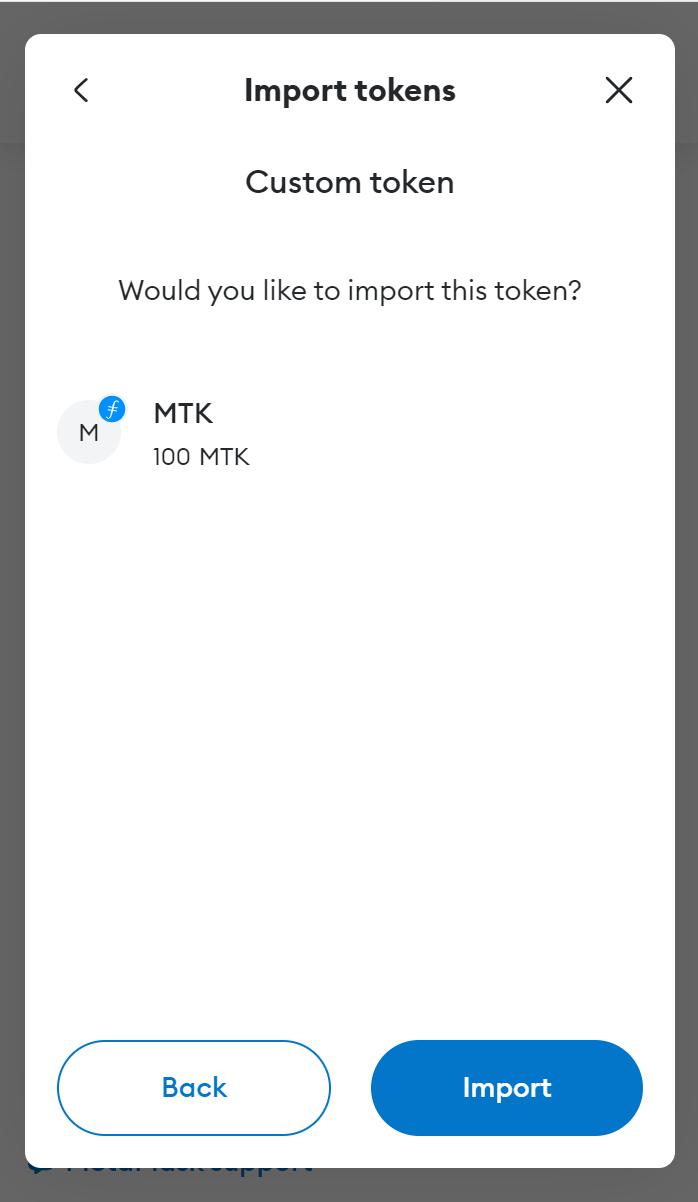
Click on the "Import tokens" option and paste the following values:
- Token Contract Address
- Token Symbol
Now you should be able to see your tokens displayed in Metamask.
Interacting with our ERC20 token with web3.js
Now that you have some practice with interacting with tokens, let's go over the flow using web3.js to interact with your smart contract.
In this scenario, you can transfer any ERC-20 token by simply providing the token address. This only works if the tokens adhere to the ERC-20 standard, which includes the transfer function for transferring tokens.
You can download the repository here.
In our project, we have two important files:
- script.js: Handles all the interactions involving web3.js, facilitating blockchain functionality. (Backend)
- index.html: Serves as the visually appealing interface where user interactions trigger significant actions and updates. (Frontend)
Workflow:
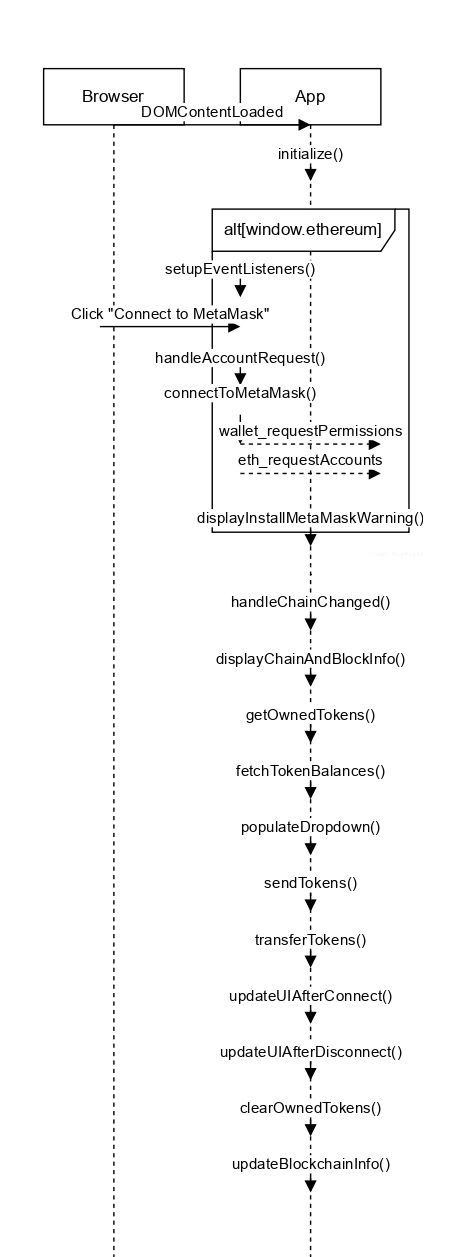
script.js
This code sets up an App class that manages interactions with MetaMask for a web application. Here's a breakdown of the flow:
- DOMContentLoaded Event Listener:
document.addEventListener("DOMContentLoaded", () => app.initialize());- This ensures that
app.initialize()is called when the DOM is fully loaded. This is where the setup begins.
- App Class:
- Constructor: Initializes state variables and defines mappings for blockchain names based on chain IDs.
- initialize(): Checks for MetaMask presence. If present, it sets up event listeners. Otherwise, it prompts the user to install MetaMask.
- setupEventListeners(): Sets up event listeners for account connection, chain change events, and token sending.
- handleAccountRequest(): Handles user interaction for connecting/disconnecting MetaMask.
- connectToMetaMask(): Initiates a connection to MetaMask, requests permissions, retrieves accounts, and sets up web3Instance.
In this function, we use:- window.ethereum.request({ method: 'wallet_requestPermissions', params: [{ eth_accounts: {} }] });
- This code requests the user's permission to access their accounts.
wallet_requestPermissionsis a method that triggers a prompt in the user's wallet (like MetaMask) asking them to grant the dApp access to their account information.
- This code requests the user's permission to access their accounts.
- window.ethereum.request({ method: 'eth_requestAccounts' });
- This line requests the user to connect their accounts to the dApp. When this method is called, it prompts the user to select which accounts they want to provide to the dApp.
- new Web3(window.ethereum);
- This initializes a new instance of Web3 using the provider injected by MetaMask (
window.ethereum). This instance will be used to interact with the blockchain.
- This initializes a new instance of Web3 using the provider injected by MetaMask (
- window.ethereum.request({ method: 'wallet_requestPermissions', params: [{ eth_accounts: {} }] });
- disconnectMetaMask(): Clears account and instance data upon disconnect.
- handleChainChanged(): Updates UI when the blockchain chain ID changes.
- displayChainAndBlockInfo(): Retrieves current blockchain information (chain ID, latest block) and updates UI.
- this.web3Instance.eth.getChainId()
- Retrieves the current chain ID, which identifies the network the dApp is connected to (e.g., Mainnet, Testnet).
- this.web3Instance.eth.getBlockNumber()
- Retrieves the latest block number on the current blockchain.
- accounts[0]
- Refers to the first account in the list of accounts returned by the wallet.
- this.web3Instance.eth.getChainId()
- getOwnedTokens(): Retrieves token balances for the connected wallet address and updates UI accordingly.
- fetchTokenBalances(): Uses ERC20 ABI to fetch token balances for specified wallet addresses.
- this.web3Instance.eth.Contract(erc20ABI, tokenAddress)
- Initializes a new contract instance for an ERC-20 token using its ABI (Application Binary Interface) and the token's contract address.
- tokenContract.methods.balanceOf(walletAddress).call()
- Calls the
balanceOfmethod on the contract to get the balance of a specified wallet address.
- Calls the
- (this.web3Instance.utils.fromWei(balance, 'ether')).toString()
- Converts the balance from Wei to Ether and then converts it again to a readable string.
- this.web3Instance.eth.Contract(erc20ABI, tokenAddress)
- sendTokens(): Handles token transfer functionality, validates inputs, and updates UI after a successful transaction.
- transferTokens(): Transfers tokens using the ERC20
transfermethod.- web3Instance.eth.Contract([ { "constant": false, "inputs": [{ "name": "_to", "type": "address" }, { "name": "_value", "type": "uint256" }], "name": "transfer", "outputs": [{ "name": "", "type": "bool" }], "payable": false, "stateMutability": "nonpayable", "type": "function" } ], tokenAddress);
- Defines a contract interface for the
transferfunction of an ERC-20 token. The ABI here specifies thetransfermethod, its input parameters (_toand_value), and the type of function it is.
- Defines a contract interface for the
- this.web3Instance.utils.toWei(amount, 'ether');
- This converts an Ether amount to Wei.
toWeiis a utility function provided by web3.js to handle unit conversions.
- This converts an Ether amount to Wei.
- tokenContract.methods.transfer(recipient, amountWei).send({ from: this.account });
- This sends a specified amount of tokens to a recipient address by calling the
transfermethod on the ERC-20 token contract. Thesendfunction executes the transaction from the specified account.
- This sends a specified amount of tokens to a recipient address by calling the
- web3Instance.eth.Contract([ { "constant": false, "inputs": [{ "name": "_to", "type": "address" }, { "name": "_value", "type": "uint256" }], "name": "transfer", "outputs": [{ "name": "", "type": "bool" }], "payable": false, "stateMutability": "nonpayable", "type": "function" } ], tokenAddress);
- populateDropdown(): Populates a dropdown menu with token options retrieved from MetaMask.
- displayInstallMetaMaskWarning(): Displays a message prompting the user to install MetaMask if not detected.
- updateUIAfterConnect(): Updates UI with account information and balance after a successful MetaMask connection.
- updateUIAfterDisconnect(): Resets UI elements after MetaMask disconnection.
- updateBlockchainInfo(): Updates UI with current blockchain information.
document.addEventListener("DOMContentLoaded", () => app.initialize());

class App {
  constructor() {
    this.web3Instance = null;
    this.account = null;
    this.requestPending = false;
    this.chainIdToNameMap = {
      314: { name: "Filecoin Mainnet", shortName: "Fil" },
      314159: { name: "Filecoin Testnet", shortName: "tFil" },
    };
  }

  initialize() {
    if (window.ethereum) {
      this.setupEventListeners();
    } else {
      this.displayInstallMetaMaskWarning();
    }
  }

  setupEventListeners() {
    document.getElementById('requestAccounts').addEventListener('click', () => this.handleAccountRequest());
    window.ethereum.on('chainChanged', () => this.handleChainChanged());
    document.getElementById('submitformSendTokens').addEventListener('click', (e) => this.sendTokens(e));
  }

  async handleAccountRequest() {
    const button = document.getElementById('requestAccounts');
    if (button.innerText === 'Connect to MetaMask' && !this.requestPending) {
      await this.connectToMetaMask();
    } else {
      this.disconnectMetaMask();
      this.clearOwnedTokens(); // Clear owned tokens when disconnecting
    }
  }

  async connectToMetaMask() {
    this.requestPending = true;
    try {
      await window.ethereum.request({ method: 'wallet_requestPermissions', params: [{ eth_accounts: {} }] });
      const accounts = await window.ethereum.request({ method: 'eth_requestAccounts' });
      this.web3Instance = new Web3(window.ethereum);
      this.account = accounts[0];
      this.updateUIAfterConnect(accounts[0]);
      await this.displayChainAndBlockInfo();
    } catch (error) {
      console.error(error);
    } finally {
      this.requestPending = false;
    }
  }

  disconnectMetaMask() {
    this.web3Instance = null;
    this.account = null;
    this.updateUIAfterDisconnect();
  }
  clearOwnedTokens() {
    const tokenInfo = document.getElementById('token-info');
    tokenInfo.style.display = 'none'; // Hide the "Owned Tokens" section
    const dropdown = document.getElementById('token-dropdown');
    dropdown.innerHTML = '<option value="" disabled selected>Select a token</option>'; // Clear the dropdown options
  }
  handleChainChanged() {
    this.displayChainAndBlockInfo();
  }

  async displayChainAndBlockInfo() {
    if (!this.web3Instance) return;
    const chainId = await this.web3Instance.eth.getChainId();
    const latestBlock = await this.web3Instance.eth.getBlockNumber();
    const blockchainName = this.chainIdToNameMap[chainId]?.name || "EVM Blockchain";
    this.updateBlockchainInfo(blockchainName, latestBlock);

    // Check if the user has owned tokens
    await this.getOwnedTokens(this.account);
}
async getOwnedTokens(walletAddress) {

    let tokens = await this.fetchTokenBalances(walletAddress);

    this.populateDropdown(tokens);

    // Show or hide the "Owned Tokens" section based on whether tokens are owned
    let tokenInfo = document.getElementById('token-info');
    if (tokens.length > 0) {
        tokenInfo.style.display = 'block';
    } else {
        tokenInfo.style.display = 'none';
    }
}

  async fetchTokenBalances(walletAddress) {


    const erc20ABI = [
      { "constant": true, "inputs": [{ "name": "_owner", "type": "address" }], "name": "balanceOf", "outputs": [{ "name": "balance", "type": "uint256" }], "type": "function" },
      { "constant": true, "inputs": [], "name": "name", "outputs": [{ "name": "", "type": "string" }], "type": "function" },
      { "constant": true, "inputs": [], "name": "symbol", "outputs": [{ "name": "", "type": "string" }], "type": "function" }
    ];

    const tokenContracts = ['0x84479f70535be87DC753943b0876FB737aa854e7'];
    let tokens = [];

    for (const tokenAddress of tokenContracts) {
      let tokenContract = new this.web3Instance.eth.Contract(erc20ABI, tokenAddress);
      let balance = await tokenContract.methods.balanceOf(walletAddress).call();

      if (balance > 0) {
        tokens.push({
          contractAddress: tokenAddress,
          name: "MTK",
          symbol: "MTK",
          balance: (this.web3Instance.utils.fromWei(balance, 'ether')).toString()
        });
      }
    }
    return tokens;
  }

  async sendTokens(e) {
    e.preventDefault();
    let tokenDetails = document.getElementById("token-dropdown").value.split(",");
    let recipient = document.getElementById('recipient').value.trim();
    let amount = document.getElementById('tokenAmount').value.trim();

    if (!tokenDetails || !recipient || !amount) {
      alert('Please fill in all fields.');
      return;
    }

    if (!this.web3Instance) {
      alert('Please install MetaMask to use this feature.');
      return;
    }

    try {

      const [symbol,, tokenAddress] = tokenDetails;

      await this.transferTokens(tokenAddress, recipient, amount);
      let token=[];
      alert(`Successfully sent ${amount} tokens to ${recipient}`);
      token.push({ contractAddress: tokenAddress, name: "MTK", symbol: "MTK", balance: (localStorage.getItem(tokenAddress) - amount).toString() });
      this.populateDropdown(token);
    } catch (error) {
      console.error('Transaction failed:', error);
      alert('Transaction failed. Please check the console for details.');
    }
    document.getElementById('tokenAmount').value = "0";
    document.getElementById('recipient').value = "";
  }

  async transferTokens(tokenAddress, recipient, amount) {
    const tokenContract = new this.web3Instance.eth.Contract([
      {
        "constant": false,
        "inputs": [{ "name": "_to", "type": "address" }, { "name": "_value", "type": "uint256" }],
        "name": "transfer",
        "outputs": [{ "name": "", "type": "bool" }],
        "payable": false,
        "stateMutability": "nonpayable",
        "type": "function"
      }
    ], tokenAddress);

    const amountWei = this.web3Instance.utils.toWei(amount, 'ether');
    await tokenContract.methods.transfer(recipient, amountWei).send({ from: this.account });
  }

  populateDropdown(tokens) {
    let dropdown = document.getElementById('token-dropdown');
    dropdown.innerHTML = '<option value="" disabled selected>Select a token</option>';
    tokens.forEach(token => {
      let option = document.createElement('option');
      option.value = `${token.symbol},${token.balance},${token.contractAddress}`;
      option.textContent = `${token.name} (${token.symbol}): ${token.balance}`;
      localStorage.setItem(token.contractAddress,token.balance);
      dropdown.appendChild(option);
    });
  }

  displayInstallMetaMaskWarning() {
    document.getElementById("requestAccounts").innerHTML = "<a href='https://metamask.io/download/' target='_blank' style='color: yellow;' onmouseover=\"this.style.color='white';\" onmouseout=\"this.style.color='yellow';\">Please install MetaMask</a>";
  }

  async updateUIAfterConnect(account) {
    const button = document.getElementById('requestAccounts');
    const chainId = await this.web3Instance.eth.getChainId();

    this.web3Instance.eth.getBalance(account).then(balance => {
      button.innerHTML = `Account: ${account}<br>Balance: ${this.web3Instance.utils.fromWei(balance, 'ether')!=0?this.web3Instance.utils.fromWei(balance, 'ether'):0} ${this.chainIdToNameMap[chainId].shortName}`;
      button.style.textAlign = 'left';
    });
  }

  updateUIAfterDisconnect() {
    const button = document.getElementById('requestAccounts');
    button.innerText = 'Connect to MetaMask';
    document.getElementById("blockchain").innerText = `Chain ID: 0`;
  }

  updateBlockchainInfo(blockchainName, latestBlock) {
    document.getElementById("blockchain").innerText = `Blockchain: ${blockchainName}`;
    document.getElementById("latestBlock").innerText = `Latest Block: ${latestBlock}`;
  }
}

const app = new App();
index.html
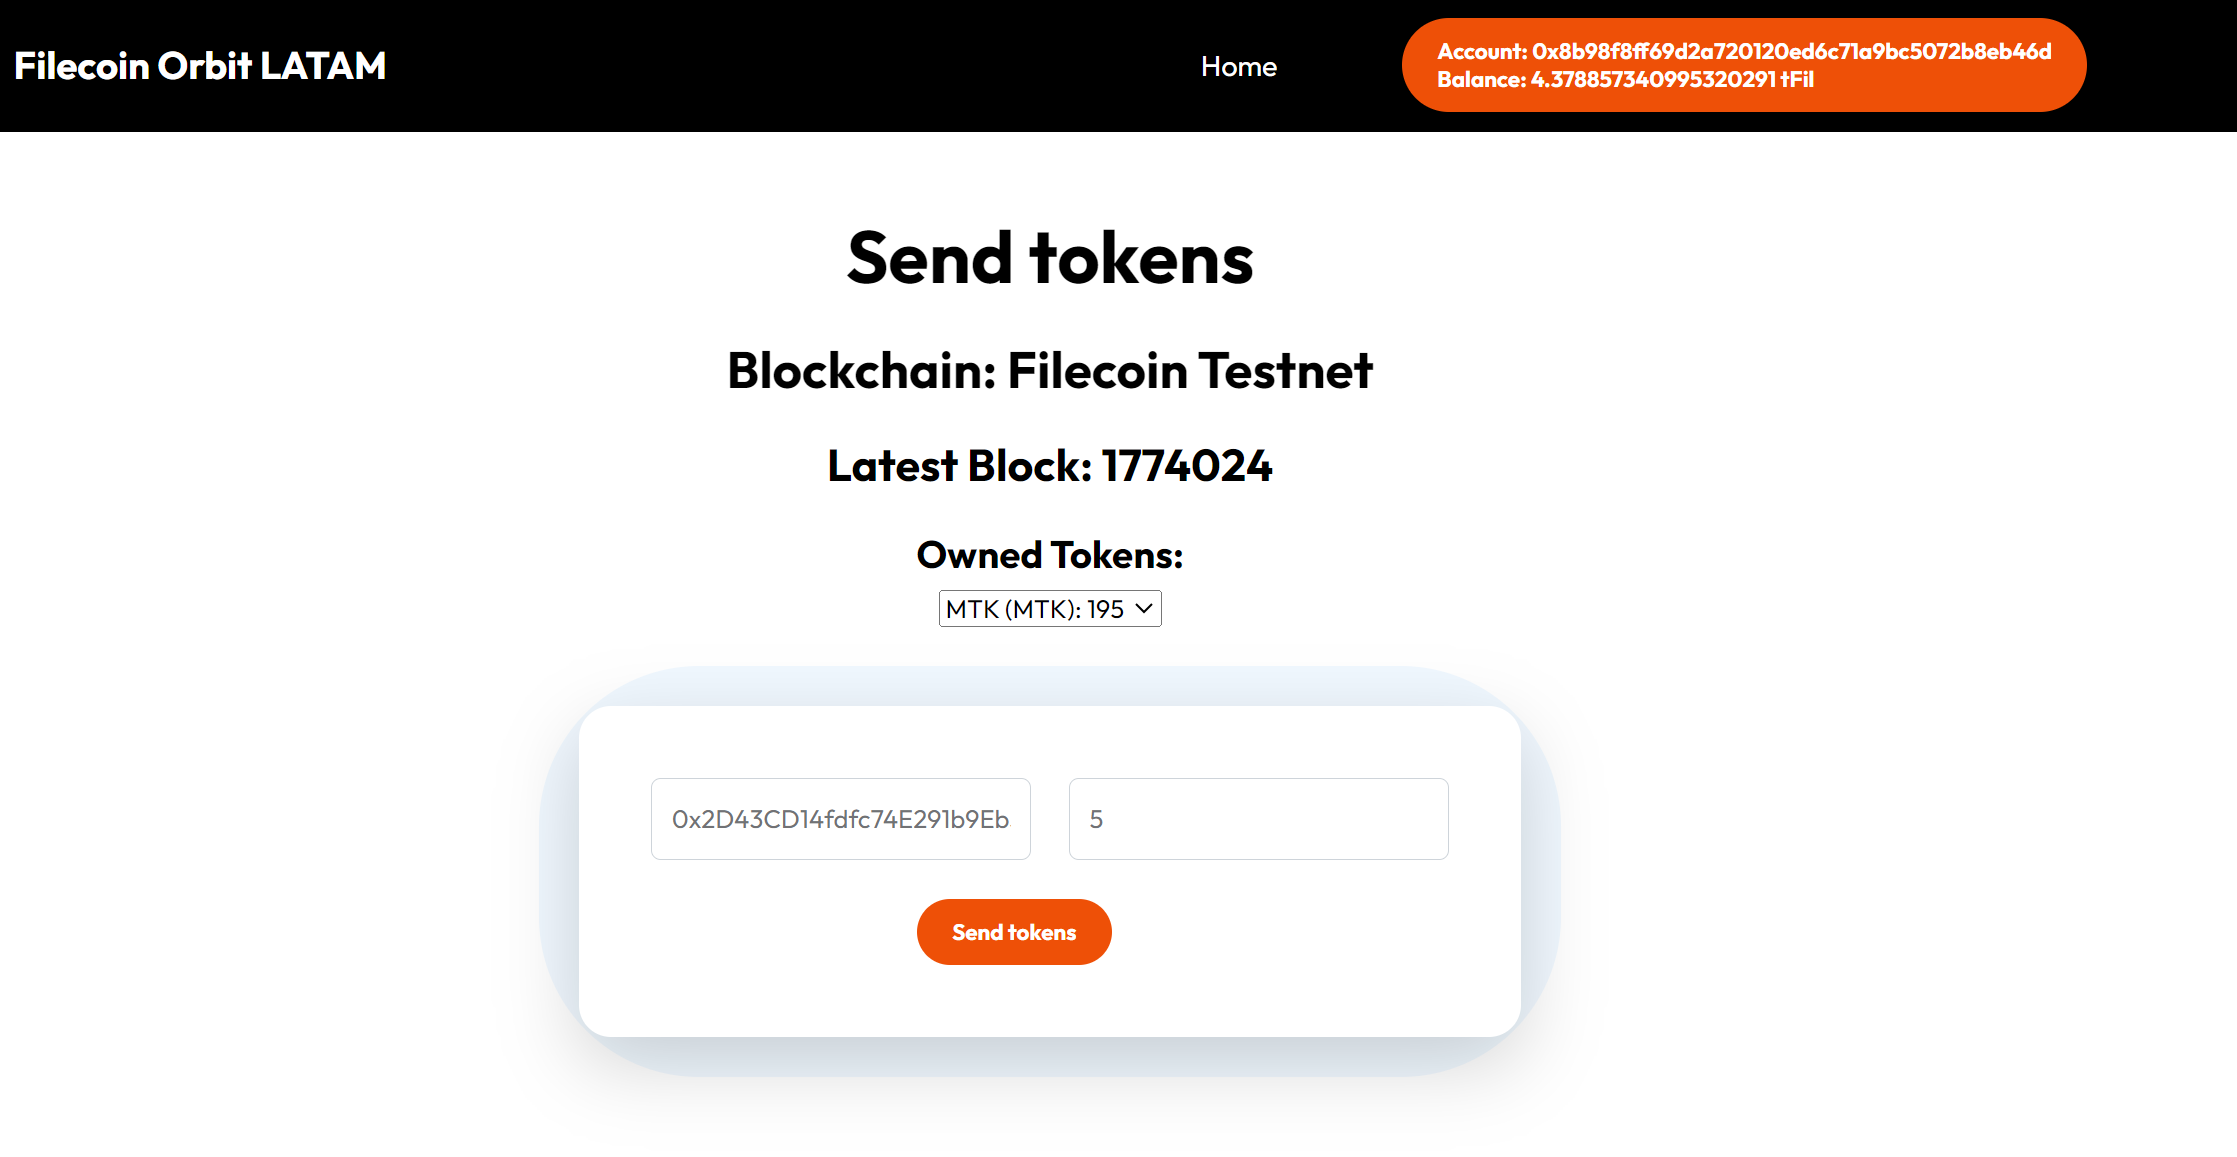
requestAccountsbutton: Initiates the connection to MetaMask.submitformSendTokensbutton: Triggers the token sending process.recipientinput: Specifies the recipient address for token transfer.tokenAmountinput: Specifies the amount of tokens to be sent.token-infosection: Displays owned tokens.token-dropdowndropdown: Lists owned tokens available for transfer.blockchainelement: Displays the blockchain name.latestBlockelement: Displays the latest block number
Deploying our solution
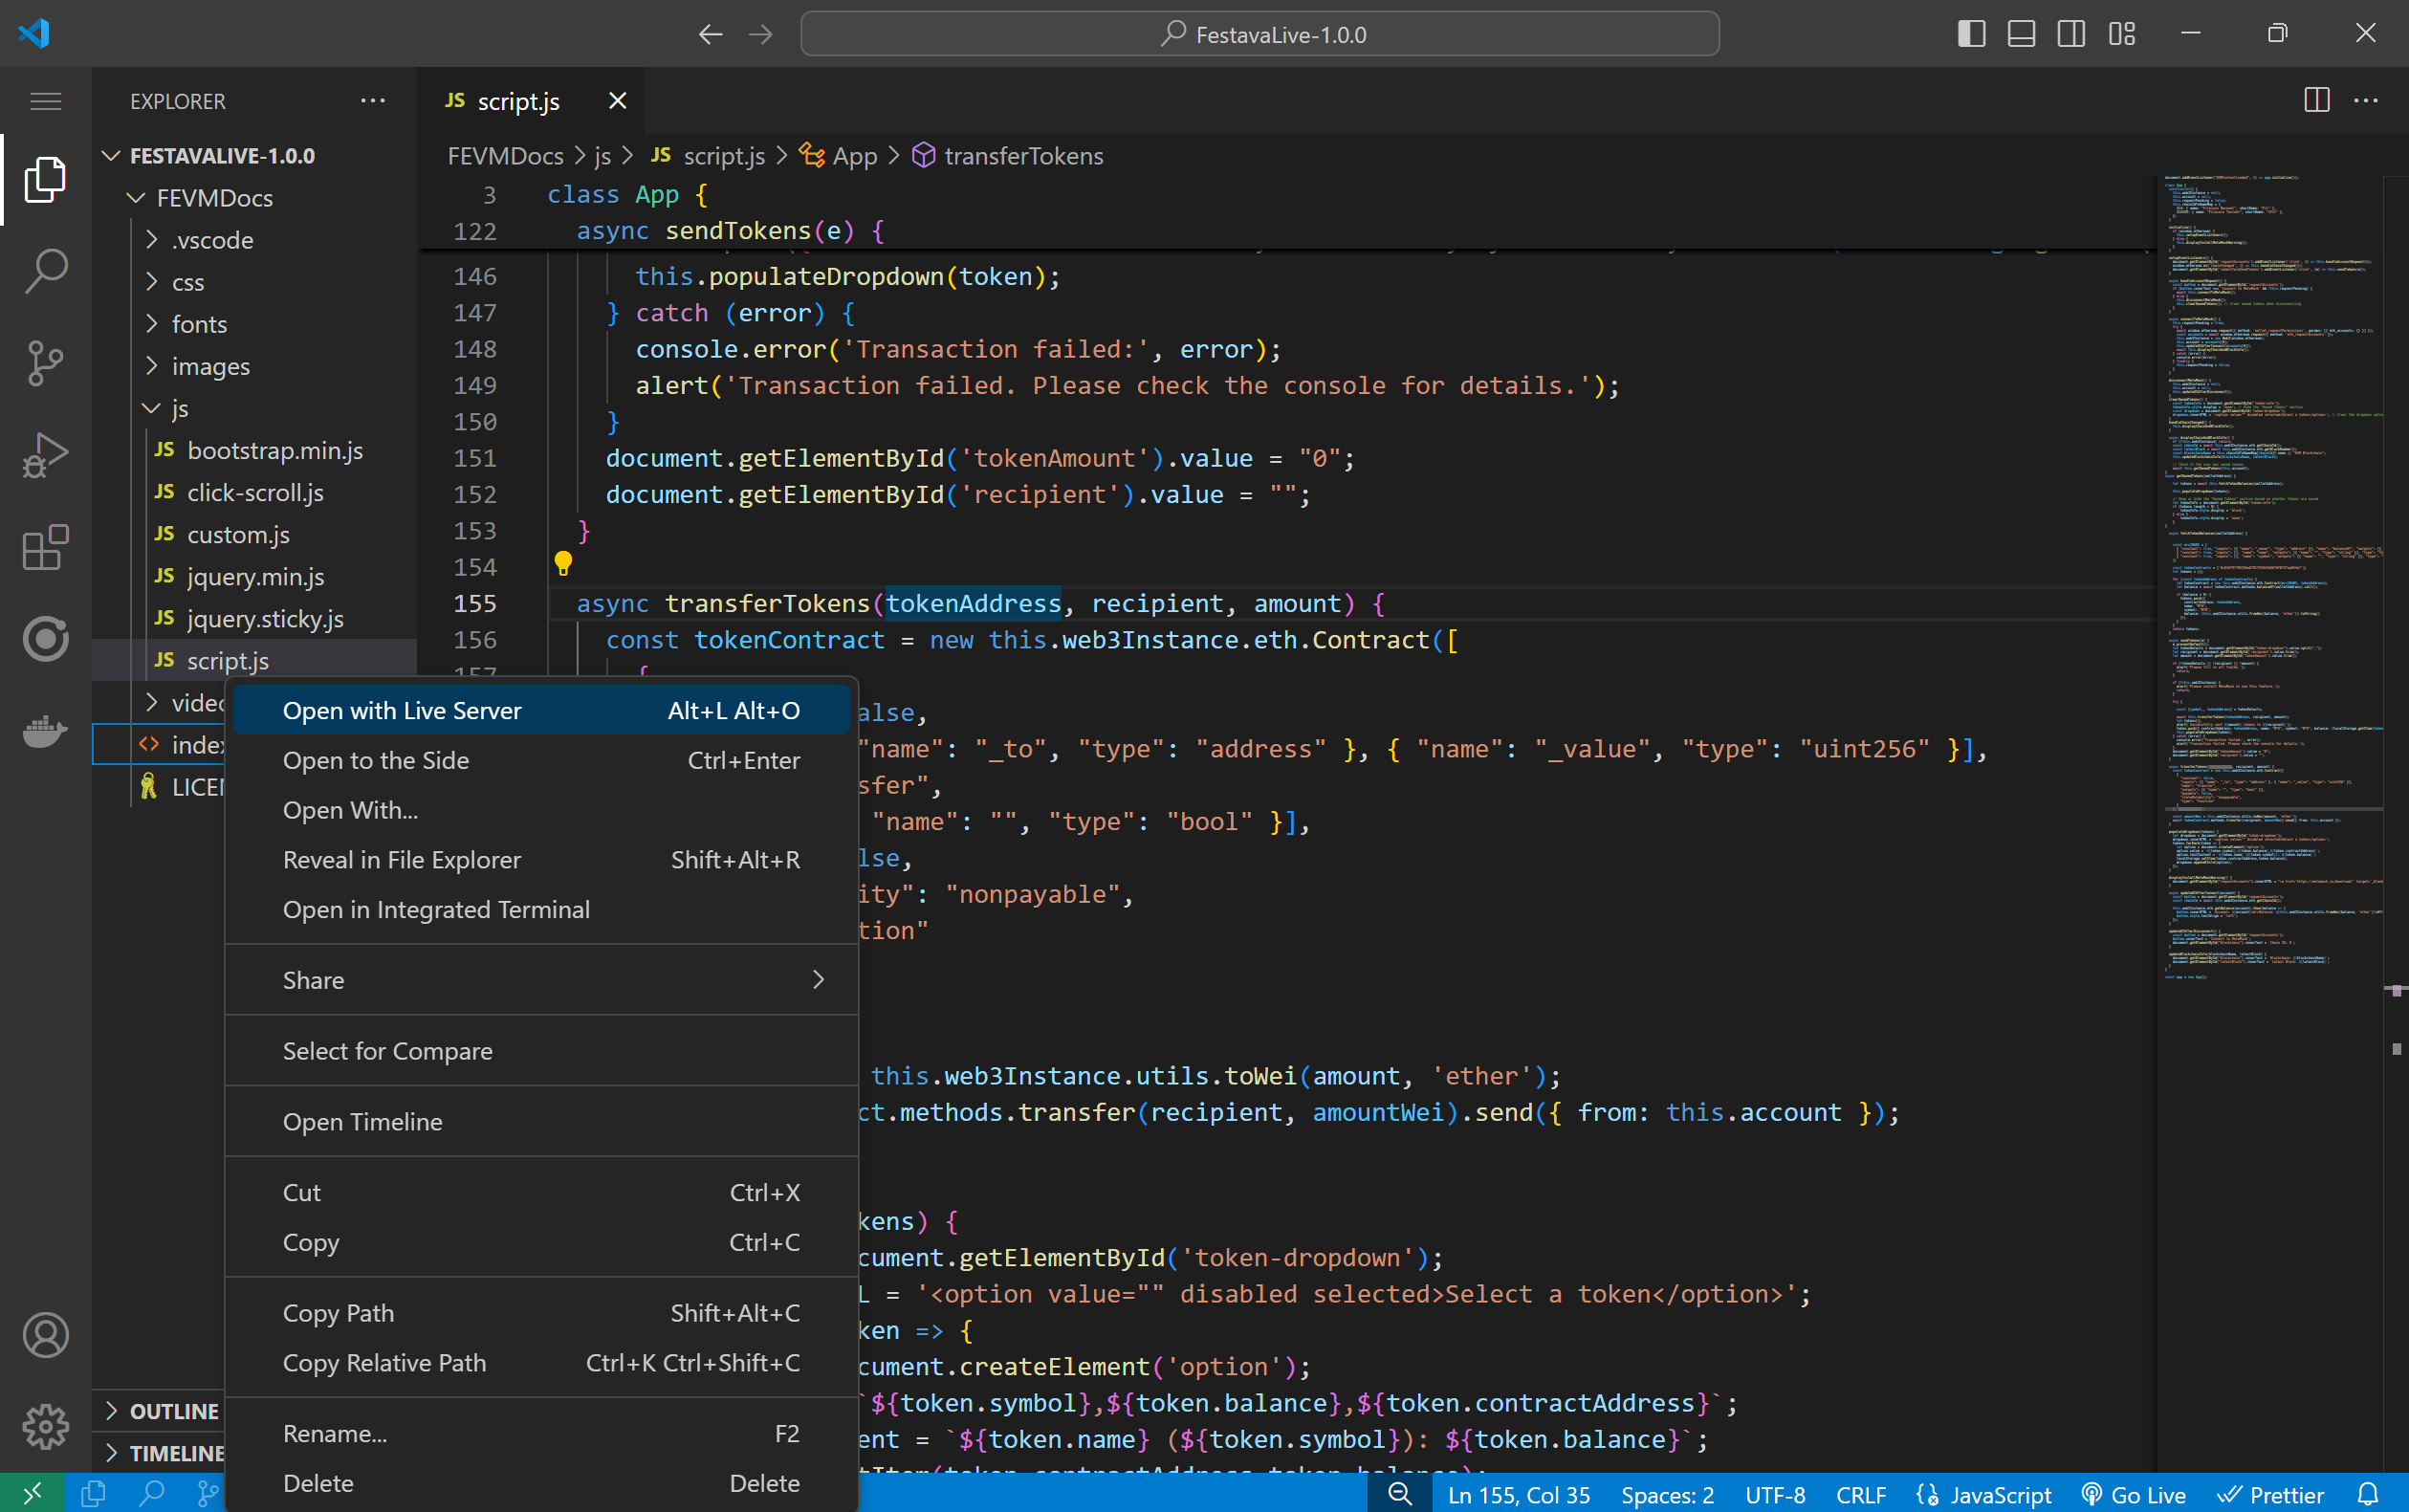
Now that we understand the solution, it's time to deploy. You need to go to Visual Studio Code, search for the index.html file, right-click on it, and then click on "Open with Live Server".
This article was based on the video tutorial below.
Crea e Interactúa con #Tokens #ERC20 en @FilecoinProject usando Web3.js [ESPAÑOL]
Learn more about web3.js
If you want to explore web3.js further, all functions with code examples can be found in the web3.js docs:
👉 Follow @web3_js on Twitter for updates!
Still have questions? You can connect with other developers and get web3.js support in the ChainSafe Discord channel.
Just go to #web3js-general for all your web3.js questions. We hope to see you there soon! 😀
About ChainSafe
ChainSafe is a leading blockchain research and development firm specializing in protocol engineering, cross-chain interoperability, and web3 gaming. Alongside its contributions to major ecosystems such as Ethereum, Polkadot, and Filecoin, ChainSafe creates solutions for developers across the web3 space utilizing expertise in gaming, interoperability, and decentralized storage. As part of its mission to build innovative products for users and improved tooling for developers, ChainSafe embodies an open-source and community-oriented ethos to advance the future of the internet.
Website | Twitter | Linkedin | GitHub | Discord | YouTube | Newsletter